10/13/2022

iPhone 13 transfering photos to Win7 by USB cable

Problem: iphone 13 connected by USB cable to PC, installs device driver on PC, iphone prompts for Trust and Passcode, Portable Device MTP Folder does not show up.

Issue: iTunes installed and installs iTunes Mobile USB device driver under Device Manager - Universal Serial Bus controllers, does not support MTP Folder file transfers

Solution: Use Device Manager - Right Click Computer - Manage - Device Manager - [Select iphone Mobile Device Driver, and right click Update from Local Machine] - install the MTP USB device driver instead

Then unplug and replug, will autodetect that an MTP Portable device has been attached, prompt for Trust and Passcode on the Phone, Winodws Folder will have - Apple iPhone tablet/media player icon for the phone

Drill down - Internal Storage - DCIM

10/04/2022

ADS Tech - Pyro API-550 or API-557 Video Capture "Bridges"

The old Firewire Video Capture bridges from ADS Tech

Do work with Windows 7 x64 and other operating systems, but there are a Couple gotchas.

First and "foremost" the cable routing is (unusual) and tricky.

1. The Composite and S-Video (INPUTS) are on the front of the device (ONLY !! )

2. The Component (INPUTS and OUTPUTS) are bi-directional and on the back of the device (ONLY)

This has fooled me into thinking the devices are burnt out or damaged from IEEE1394 plug-in play more than once.

THEY ARE NOT DAMAGED!!

Check your cable connections and make sure any Composite or S-Video connections are made to the "front" of the device only.

It seems "intuitive" in the year 2022 for a device from 2002 to be either bi-directional or preferring to put the INPUTS on the back of the device.

This is simply "not true".

They come from an age when such standards had not been worked out yet and every iteration was an expensive investment.

These are almost unique in supporting Component (YPrPb) signal Inputs and Outputs.. but that adds to the confusion, since those are strictly addressed on the back of the device.

It kind of makes sense when you think of these for majorly being used to offload Camcorder tapes and Inputing them from the front, and "printing" or offloading back to VCR tape from the back.

Component Input more often came from Satellite or Cable boxes from the back and then Output for "printing" from the back.

But like I said.. today that is not the norm.

The SECOND major gotcha.. is the S-Video connectors are autoselect, they are used for Input when the Composite connector is not plugged in.. and They are "snug" and "deep" inside a plastic tunnel for the connector.

The THIRD major gotcha. Many S-Video plugs came with a hefty re-enforced collar, and if casually shoved into the tunnel.. they would "seem" to connect and stay put.. but they were .. very.. far from plugged in.

This resulted in the device not producing any output at all.. even if the front switch were thrown from digital input to analog and it "seemed" to be catching frames.

If Composite and S-Video are not plugged in.. it doesn't matter the audio cables are plugged in.. they will not be sampled until video capture frames are being caught.

The S-Video collar should be absolutely shoved.. very deep and "flush" against the plastic surface of the "front" of the box.

The FOURTH gotcha tip.. is if you do connect Inputs for Composite or S-Video on the back of the device.. you "may" catch some intermittent "black frames" with green or dark patterns reminiscent of space invaders. 

You won't get full video frames or audio samples.. but it can fake you out.. into thinking something is wrong with the box.. it is catching the signals routed to the wrong connectors.. "over the air" or parasitically from close traces on the circuit board.

Its catching some pseudo static interference patterns from the wrongly connected Inputs plugged into the back of the box from the front INPUTS, they are acting like antenna, just enough to let the box try to correct for the weak signal and produce a black frame. This is not the way its intended to work.. and its not a failure mode.. you've got the cables wired up wrong.

I don't know if plugging the signal cables wrongly into the "back" of the box will damage the output chips inside the of the box or not.. but probably.. just don't leave them this way for a long time.

Also, recovering from a bad wire routing path is not as easy as you might think.

The box or the operating system IEEE1394 drivers or the APT-55x / AV/C Tape device drivers can get "clogged up" with incomplete stream data.. the only way to completely "purge" this garbage is the following;

1. shutdown the computer, turn it off completely

2. shutoff the ADS Tech Pyro box

3. re-connect the Inputs to the front of the Box

4. make sure the Firewire cable and the power cable to the ADS Tech Pyro are connected

5. turn on the power to the ADS Tech Pyro box "first"

6. Very IMPORTANT! - wait a beat for the ADS Tech Pyro box to finish booting, go "Blue" then tap the D to A capture switch on the front of the box, wait for it to go analog "Red"

7. Then turn on the PC

Just because the operating mode of the ADS Tech Pyro is analog "Red" does not mean everything is alright, it tells you nothing of the status of the Input and Outputs, and it does not signify a status of the success or failure at capturing video frames and audio samples. - It (only) tells you the box understood it should (go into) analog capture mode, when a signal appears on the inputs.. this is "pre-operating mode" this is a command understood LED .. nothing more, it does  not "blink" or change for any other reason than if you tap the switch, or shut the power off and on again to reboot.

A lot of people over the years have "head canon" ascribe "meaning" where there is none.. it is a simple command acknowledged, status indicator for the command.. not the function of the box, not the currently running status. Its a state  indicator, nothing more. - Think of it a Flip-Flop circuit with an LED that holds a line high or low on the input of a DV capture chip. That's it.

Also, if you do not wait, it won't even acknowledge the tapping of the button, it will remain solid "Blue".. it only starts monitoring for a switch tap.. after it completes its startup cycle.. so if you tap "too soon" nothing will happen.. pressing harder.. does not help.. you have to wait for the complete reset/reboot cycle to complete. And on something this old.. it can seem like a long time. 20-30 seconds.


9/25/2022

Blackmagic Designs H.264 Pro recorder - getting it to Work on Windows 7


It works good, but.

Desktop Video 10.5.4 is the preferred version for the last of the Blackmagic Designs Desktop Video  Updates that will install without problems on  Windows 7.

After this time they stopped signing the drivers properly for installing to Windows 7 x64.

Overriding and attempting to use later versions of Desktop Video to install still results in Code 10 unable to start. It is (not) a "did you install all updates" problem. It is (not) a SHA2 (sha256) problem. Disabling Integrity Checks and Test Signing mode do not work. 

Stick with 10.5.4

H.264 Pro will (not) appear in the [ Blackmagic Desktop Video Utility ]. The Decklink or Shuttles devices will appear in the [ Blackmagic Desktop Video Utility ].

H.264 Pro (will) appear in Windows Device Manager, but will not appear as a device when opening "Media Express"

This is a symptom of the "firmware" on the H.264 Pro not matching that required for the Desktop Video 10.5.4 version .. and thus the firmware necessary for "Media Express" to "see" the device.

In later versions of "Desktop Video" the state of the firmware on the device will be automatically Updated to match that needed by the "Desktop Video" and the tools like "Media Express" that comes with it.

But not for "Desktop Video 10.5.4"

Instead you must manually open the following path in Windows Explorer;

C:\Program Files (x86)\Blackmagic Design\Blackmagic Desktop Video

And manually run "BMDStreamingServer.exe" by clicking on it.

An audible unplug and plug "sound" will take place, and then a dialog box will pop open and Ask for Permission to Update the firmware on this device, after allowing it to take place, it will then inform you the Update is complete and require you to unplug and plug the USB cable in again.

The device will re-install the windows device driver and appear in Device Manager as before.

The device "will (not)" appear in "Blackmagic Desktop Video Utility" - this is normal.

After the firmware update the device (will) appear under the available [Device] menu option in "Media Express" - it will be [greyed out] as long as "Media Express" is open to the default "Playback" tab, but it will be listed as [ H.264 Pro Recorder ], when clicking on the [Log and Capture] tab it will now be listed in a dark bold font as an available device under the [Devices] menu option.

The device use a (Special) [Media Express > Edit > Preferences > Quality] button to change the "Encoder" bit rate.

The device uses the same (Special)[Media Express > Edit >Preferences] dialog window to choose "Project Video Format"

While in "Media Express" the default tab is "Playback" - Live H.264 video will not appear in the Preview window... while the playback tab is selected.

Choosing the "Media Express" [Log and Capture] tab should start a Preview of the video being capture by the device even before the capture has begun.

While the "Media Express" application window does (not) have focus, Audio cannot be heard, even while Video is being played in the Preview. Simply "touch" the "Media Express" application window frame and you should be able to hear audio playback while the Video Preview is running. When the windows frame looses focus the audio will go silent.

The Audio Inputs to the H.264 Pro are not Consumer line levels, they are Professional, you may have to turn up the Volume to maximum to "hear" any Audio that is being captured, even while in Preview mode. 

A pro-level converting amplifier maybe needed to externally match the audio levels before submitting them to the H.264 Pro Recorder for capture, there are no audio boost or amplification features built into the device.


2/16/2022

Blackmagic Design - H.264 pro Recorder + MXTiny

The Blackmagic Designs H.264 was really an Analog or SDI or HDMI to h.264 hardware codec device that transferred an MPEG-4 Transport Stream file over USB 2.0 to the host file system.

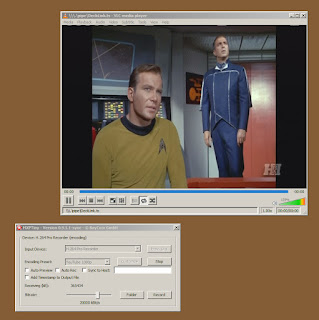
Initially it was usable only with Media Express, but later an opensource program called MXTiny could access it and capture to the local file system.. but also spawn VLC - VideoLAN Client to "Postview" the recording stream during the capture, playing the file from the file system after it was stored there.


This has value since if the video stream were not streaming or there were something wrong with the audio levels, then the capture could be stopped and corrections made without investing a lot of time and restarting the capture later.

Its not quite what video capture was with a true Preview window.. but its a clever and innovative "meeting the conceptual method" half-way.

2/15/2022

Blackmagic Design - H.264 pro "corder"

 The H.264 Procorder comes from about 2011 its a lot different from many other Blackmagic devices, while sharing a similar metal box and BNC and TRS connectors.

The micro USB port is used for both configuring and downloading the compressed H.264 video.

Media express works with this much as it would with the "SDI/HDMI mini recorder" or other Blackmagic products, however it does not produce a "Preview" of the video being captured and compressed before or during capture.

I have not explored (if any) Blackmagic WDM device driver / Directshow filter options with third party software exists yet.

One thing it does with ease, is it offers an NTSC and NTSC (progressive) capture profile from the Media Express "Preferences" menu option after selecting the h.264 device for capture.

By "omission" this implied it captured in an h.264 "interlaced format" which is rather uncommon.

After a test capture this was indeed confirmed to be the case.

MediaInfo reported an h.264 interlaced file.

It played back in VLC and Windows Media Player without issue.. however much of the player software since that time have defaulted or preferred to playback "progressive" as with game capture footage.. since that also takes less time to reassemble than "interlaced".

"Oddly" the captured video does not playback from within Media Express.. and attempting to play it back crashed the program. This was addressed simply by using VLC or Windows Media Player.

 However "interlaced" capture format from an "interlaced" source preserves more of the image detail and avoids introducing inescapable "motion blur" when compressing interlaced into progressive formats.

The default bit rate for the NTSC "interlaced" profile is 19.6 Mbps, substantially higher than most people expect from a typical h.264 video capture device trying to preserve disk space. I do not know what options there are with regards to changing the capture rate. Several other profile choices are listed in the Media Express menu targeting various common playback devices from that time.

There does not appear to be a signal source input selector like there is for other Black magic devices.. which leads me to believe it will auto select which input to source the input video from.

The choices are BNC Composite / S-Video, HDMI, and SDI (input, not output!)

The only output being through the micro USB port.

The box does warm up during capture, and while simply idling.

More exploration of this box is planned,

Snell & Wilcox Kudos+ CRV600AD - S-Video to SDI converter

 The Snell & Wilcox CRV600 comes from about 2011 or 2012 and contrary to the the earlier rack mount versions of their "Converters and Sychronizers" is a monolithic circuit board with Analog ADV chips.

The earlier full width rackmount versions used circuit cards and bays to host about six or eight circuit cards to create a bespoken device tailored for a purpose.

The CRV600 is a "converter" from Composite or S-Video Analog to SDI Digital, and an Aspect Ratio Standards Converter.. which makes it very interesting in that it can convert from PAL to NTSC and vice versa as well as deal with Aspect Conversion between various screen widths and pixel sizes.

It has S-Video Input and Output 4 pin DIN connectors and BNC Composite Input and Output connectors.

The SDI BNC connections are redundant with a loop between dual outputs for the SDI signal.

That it has Outputs for S-Video and Composite leads me to believe it can be used for pass-through to clean up and convert between various standards and then return that to analog outputs, but there is no SDI input. So conversions between SDI to Analog is not possible.

The CRV600 has one USB type B port for connecting to a PC.

This is optionally used for configuring the box, however most settings can be made from the front panel with a constellation of buttons and jog wheel and a backlit LCD screen.

The PC software for accepting a connection from the CRV600 over USB is free for download, but is no longer hosted by the companies which later merged or purchased the Snell & Wilcox line of products. Snell & Wilcox was a UK company that went through a consolidation phase and then merger/sale to Grass Valley in California USA.

The PC software consisted of a device driver for Windows XP (32 bit ) which does not work with Windows 7 64 bit. This comes from the RollTop USB hosting software which then offers up access to the device via a TCP/IP connection over a LAN  TCP/IP port.

Then a program called RollCall was installed on a central PC to manage multiple LAN connected devices via Ethernet. This eventually enabled a studio environment to be managed by a central console and dialog boxes for each remotely connected device to be configured.

Its a lot simpler to use the RollCall software, but not strictly necessary.

Since the device comes from the UK it came default configured for PAL signal types and required some exploration to figure out how from the front panel to set not only the Input and Output connection jacks would be configured.. but also what signal type to search for on the S-Video jack.

Initially I had a problem where the diplay would flash "PALM" ( that is PAL-M )  then "Error" and refuse to lock on to and convert from Analog to Digital. The setting was buried in the "Others" button menu and once it was changed to NTSC (not PALM or NTSC-j) it started working without error.. perfectly.

I connected the SDI output to a Blackmagic Designs SDI/HDMI "mini recorder" and was able to use that with Blackmagic Designs "Media Express" to make recordings.. the Blackmagic Design WDM device driver also let me use Noel Danjou's AMCap, Virtualdub, SONY Vegas, OBS Studio and other capture software with the CRV600.

The CRV600 has an auxiliary corner of the box for optional plug in models to customize it further. One such is the "AD" or AuDio (AD) module which uses WECO 930 three pin strain relief audio jacks to bring in Balanced or Unbalanced Audio and Audio Embed the information in the same SDI signal.

Like the Analog video outputs, the audio section also has analog outputs.

This section can also "delay" the captured audio in order to sync it up with the video since analog to digital video conversion takes a finite amount of time and can often hasten the audio relative to the video since audio conversion takes less time.

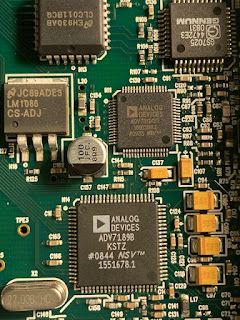
The chips on the mainboard of the CRV600 are ADV7311 and the ADV7198 and several much larger FPGA or glue logic chips.

The ADV7311 is a Digital to Analog converter, no doubt for the Analog Output connectors.

The ADV7198 is a 12 bit capture, 10 bit internal workflow to standard 8 bit SDTV Video Decoder with the Analog Devices ADLLT line length FIFO process to ensure line length sampling compliance at 720 samples per line, and a sophisticated sync recovery system for dealing with VCR head switching noise. This is advertised as their "mini-tbc" feature.

It also has Digital Noise Reduction, Chroma Transient Improvement (edge sharpener) features and more.


As a Synchronizer, it can also accept a Reference signal for clocking the output from its full frame memory buffers, eliminating vertical jitter.

The CRV600 also has the usual PROC-AMP controls for Brightness, Contrast, Hue and Sharpness.

2/06/2022

Secrets of the "Video Capture 6.0" program bundled with SONY/Magix Vegas

The Video capture program bundled with SONY Vegas and later Magix Vegas has an interesting development history. There was the time before when SONY owned it, and the time after when Magix owned it. And inbetween it seemed to fall in quality and was revitalized or fixed after the acquistion.

The first of the great reawakening seems to have been during the Vegas 14 update releases, as a patch specifically mentions Blackmagic Decklink functionality had been repaired.

That meant Vegas 15 was the first to have it fixed "out of the box".

The readmes and release notes are well worth the time to read.

For Vegas 15 the readme is located in the file system after install:

C:\Program Files\VEGAS\Movie Studio 15.0\readme\Videocapture_readme.htm


It seems to be treated by this document as if its an entirely separated program, bundled with the larger suite of Vegas tools.


Video Capture 6.0
 
July 2007
1.0 Welcome

Thank you for purchasing Sony Creative Software Inc. Video Capture 6.0 software. 


The next section contains a lot of tips and insider information regarding the program including advice on how to deal with certain situations.

2.0 Known Issues

Capturing to the same hard drive where your operating system is installed can result in dropped frames. If you have more than one drive, you can specify the target drive on the Disk Management tab of the Preferences dialog.


The next section covers DV specific information.

OHCI-compliant IEEE-1394 DV capture cards are required for DV device control.

Even if device control does not work, you may still be able to capture video by manually controlling your video device (e.g. pressing play on your camcorder's remote and then clicking the Capture button in Video Capture). If you are having capture problems, try clearing the Enable DV device control check box in the Preferences dialog.

If your DV camera is connected to another IEEE-1394 device ("daisy-chained"), the bandwidth of the IEEE-1394 channel may not be sufficient for print-to-tape operations. Connect each device to its own IEEE-1394 port before using print-to-tape.

For more detailed OHCI hardware, drivers, and DV information, visit the Sony Pictures Digital DV support page.

When using a digital-to-analog transcoder without a LANC adapter connected, clear the Enable DV device control check box on the General Preferences tab.


More information on genetic capture cards, and tv tuners

If you experience degraded system performance, clear the Enable still image capture check box on the Capture tab of the Preferences dialog.

If you experience problems using a TV tuner card or displaying closed captioning, clear the Enable still image capture check box on the Capture tab of the Preferences dialog.

If you're unable to preview an MJPEG-encoded file to an MJPEG external monitor, select the Close current device when in file playback mode check box on the General tab of the Preferences dialog.


Of (Major) interest is the same Vidcap program is installed with "Vegas" or "Vegas Movie Studio". 

Movie Studio is a slimmer collection of tools and years later its much easier to find Movie Studio than the Pro or Edit editions of Vegas. It also cost significantly less than the Pro or Edit versions if you don't need any of those other tools.


4.0 Installation

Video Capture is automatically installed with Vegas and Vegas Movie Studio software.


Vegas 16 saw little change to this same readme in;

C:\Program Files\VEGAS\Movie Studio 16.0\readme\Videocapture_readme.htm

bit added a new one from the new owners "Magix";

C:\Program Files\VEGAS\Movie Studio 16.0\readme\Vegas_Movie_Studio_readme.htm

but seems to not contain any more useful information for the Vidcap program.