12/22/2016

DSLAM, homebrewing an ADSL test lab

Trivial pursuits.. I bought a ZyXEL IES-1000 and successfully hypothesized enough to reconfigure and enable it to bridge ADSL traffic between a Cisco 877 adsl router and the ZyXEL ethernet port.


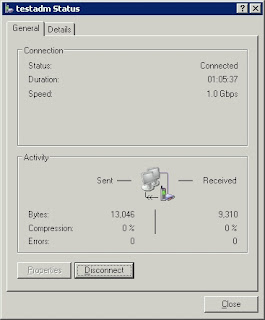
Then used the RASPPPOE third party protocol driver on XP Pro to build an add-hoc Access Concentrator. -- and.. it works.. now I can test various ADSL modems.


The [ Incoming ] connections on XP are usually a single instance of a "listening" daemon per Ethernet interface. Connections "spawn" a new instance of an Incoming connection listed below the daemon with a status of (connected).

When a PPPoE client on the LAN sends out Ethernet PADI-nitiate packets to discover any access concentrator servers over Ethernet broadcast, the "listeners" send a uni-cast reply as a PADO-ffer packet with the servers Ethernet MAC address.. so that the PPPoE client can then uni-cast directly to an (A)ccess (C)oncentrator server and begin to setup a PPP session.

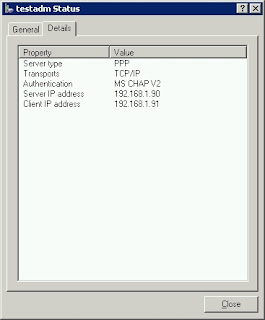
The PPP session then (Authenticates using CHAP) and bargains for privileges and concessions until the two reach an agreement on authentication, tunnel service parameters and TCP/IP addresses for each end of the tunnel.

Then the session spawns a Virtual TCP/IP Interface on both the client and server 'end-points' and assigns those the negotiated IP addresses.

Ethernet is not TCP/IP -- this is "waaay" below that on the OSI scale.. its the original bare bones and knuckles wire protocol of one of the oldest and first networks. ADSL basically "borrows" raw Ethernet.. so it can take stabs in the dark and make end to end connections on top of an ATM "circuit". An ATM circuit is really more or less like a USB or Serial connection, its bidirectional and carries signals back and forth.. with some ability to prioritize signals if you use VPI and VCI and PVCs.. which most people do not.


The whole setup and connection from ATM to Ethernet to PPP to TCP/IP was relatively easy. The hard part was recognizing that the ADSL ports on the DSLAM were "tagged" or enabled to be members of a default Ethernet VLAN, which was switched off. 

The net effect was I could see "PADI(client).. PADO(server).. PADI(client).. PADO(server)" while using wireshark to monitor the XP ethernet port that was acting as the access concentrator server.

But the client never seemed to "see" the servers "PADOffer reply".. once the  VLAN was "enabled" replies traveling from the ZyXEL Ethernet management port started getting back to the ADSL ports.. and the connection pretty much immediately locked on like a snapper turtle and wouldn't let go. 

After that the Cisco or the ZyXEL seemed to be sending "keep-alive" echo and reply requests to monitor each side of the ATM connection.

[Concept-wise] it also took a moment to "think" about how ADSL works.

The ADSL modem and ADSL DSLAM (DSL A-ccess M-ultiplier) are essentially "standalone" ATM switches. Each has an Ethernet port (ingress/egress) point, both on the customer DSL modem side and on the DSLAM modem side. As far as the customer and provider are concerned the ADSL "cloud" they plug into is "magic". 

The ADSL part just fires up and starts blasting "tones" over a dedicated circuit looking for a partner.

A customers phone line that is "provisioned" for DSL is always ready to respond to those tones which are mostly beyond the range of human hearing. And normal old-fashioned phones are fitted with a low-pass filter to make sure you can't hear them.. and make sure the low frequency human voices can't interfere with the higher frequency DSL tones.

Its all slightly similar to USB signaling except USB signals are much higher frequency and more complex. DSL technology was developed in the 1990's primarily for carrying digital television signals.. but that didn't work out so well.. so it got repurposed for carrying digital data. Initially the chips that encapsulated ATM communications were expensive.. but over nearly 30 years they have come down in cost quite a bit due to volume discounting.

Really old-fashioned acoustic modems worked in the much lower frequency voice range and could work sending audible (to humans) "tones" over the switched voice lines of ancient central offices. 

They could also leverage the switch voice line "phone number" database for addressing both humans, fax machines and destinations listening for data connections (like bulletin boards or Internet service providers).

The thinking back then was there was no need for high data rates and the infrastructure was too costly to replace.. that changed over the years.. but also the aging and failing voice lines were poor conductors of reliable communications. The longer the wire the worse the ability to carry high speed or reliable signals.

In any event -- The connection from ADSL modem to ADSL switch (or DSLAM) had to be setup first. Its a "bridge" because it [bridges] two types of travel (or communications) in this case it [bridges] Ethernet networks so that they appear as (one) broadcast zone.

That is an Ethernet station on one end with a MAC address can [shout] (or broadcast) a message to all other stations on the entire broadcast zone.. including the ADSL switch (or DSLAM) side. 

A PPPoE server called an [Access Concentrator] can then listen for and respond to a request for service and "Offer" its services to the ADSL connected Ethernet "client". -- they then begin a PPP setup conversation and turn that into a PPP "established session" over Ethernet.

PPP "bridges" TCP/IP connections.. and the PPP client on the ADSL modem "Creates" a TCP/IP virtual interface and assigns it the TCP/IP address the two PPPoE speakers agreed upon.

At this point the ADSL modem has become an end-point on the Internet and it can go on to perform NAT or Firewall protection and even act as a DHCP server to hand out additional or NAT'ted TCP/IP addresses to clients on its local private network.

Of course the ADSL modem could have simply acted as a [bridge] for Ethernet traffic and permitted or enabled a different computer connected to its Ethernet port (broadcast zone) to perform PPPoE all by itself and establish a similar set of features for the local customer side LAN.. but that's a minor design choice.


A simple Ping from the XP concentrator confirmed both ends of the connection were responding.


12/20/2016

RRAS/IAS, fails to start service Error 340

Its always bothered me that Win2003 and XP had a RRAS (Routing and Remote Access Service) that was frequently broken. Its not the same thing as ICS (Internet Connection Service). The usual failure comes after removing software or running a Registry cleaner. Then the RRAS service fails to start with error 340. Here is how to fix that.

First the failure mode is (attempting to start "Routing and Remote Access") from the [services.msc] mmc snapi, the service briefly starts then stops and throws a dialog referring to Service specific error 340

The [System] Event log records:


If you enable "tracing" you can get a more detailed break down by the service, its helpers and it dependent services.

Enabling logs for RRAS - essentially a netsh command to "enable/disable" causes the logs to "appear" in the C:\WINDOWS\tracing directory.

“netsh ras set tracing * enabled” 
“netsh ras set tracing * disabled”

Then when you try to start the "routing and remote access service" again, it will create new log files with more details as to status and why certain things fail (in detail). Fail and Detail, seem like a Yin and Yang don't they?


The logs are in plain text and easily readable if somewhat undocumented.

In general however they refer to services and dependent services, their calls (successful or not) and somewhat verbosely why they succeed, or why they fail.

RRAS for example has depedencies on NetbiosGroup and the RPC service, but also the Remote Access Connection Manager.. and more importantly the IAS authentication database.

All of these have more familar names and achieved their wild and wacky names through history and marketing strategy to avoid tripping over possible legal issues. Or simply to "sound" unique and different while implementing common everyday protocols used across the Internet. Balmy "Peanut butter SOAP" sounds better than simply lard butter bar.

For me IAS on XP is usually the problem.

IAS is not the "full daemon" service it is on Windows 2003 Server, its a stripped down ODBC jet engine backed microsoft access database file in the C:\Windows\system32\IAS directory which holds a few tables. It takes the place of a general purpose RADIUS authentication daemon and backend and can interface with the local accounts to validate and authorize incoming users making connection attempts. Like all file based databases its vulberable to attack and damage by "outside" forces lurking on the hard disk and in the greater operating system. Occasionally it needs to be restored or "reset" back to pristine condition from a copy of the original .mdb files that come with the WindowsXP installer on the cdrom.

MMC snapins for Windows2000 worked to manage the RRAS service on XP up through XP SP2 but after SP3 stopped working, so your reduced to using netshell or netsh commands, or third party tools to manage a "Remote Access Concentrator" or as XP calls it the "Routing and Remote Access Service". An mmc snapin is available for Win2003 but will not work on XP even if it copied over to an XP system. XPLite is a tool from Australia which appears to be able to disable the Windows File Protection system so that you can remove and reinstall RRAS.. but takes a lot of work, intuition and luck.. and does not address "missing" or corrupt registry keys.. or unregistered DLLs due to indirect software withdrawls from the system.

So first IAS may need to have its C:\WINDOWS\system32\ias default dnary.mdb and ias.mdb files restored from the Windows XP install media.. use the Expand tool basically to unzip them and replace them, carefully moving the suspect corrupt ones to a safe backup location.

Next "missing registry keys and values"

This has been posted in many places on the internet, but I put this in a Fixme.reg file and saved it, dbl clicked on it and merged it into the existing registry (mostly its about fixing IAS 'record store' support for RRAS):

Windows Registry Editor Version 5.00

[HKEY_CLASSES_ROOT\CLSID\{6BC096C4-0CE6-11D1-BAAE-00C04FC2E20D}]
"AppID"="{A5CEB593-CCC3-486B-AB91-9C5C5ED4C9E1}"
@="IAS OLE-DB Data Store"

[HKEY_CLASSES_ROOT\CLSID\{6BC096C4-0CE6-11D1-BAAE-00C04FC2E20D}\InprocServer32]
"ThreadingModel"="Free"
@="C:\\WINDOWS\\System32\\iasrecst.dll"

[HKEY_CLASSES_ROOT\CLSID\{6BC09693-0CE6-11D1-BAAE-00C04FC2E20D}]
"AppID"="{A5CEB593-CCC3-486B-AB91-9C5C5ED4C9E1}"
@="IAS Netsh Jet Helper"

[HKEY_CLASSES_ROOT\CLSID\{6BC09693-0CE6-11D1-BAAE-00C04FC2E20D}\InprocServer32]
"ThreadingModel"="Free"
@="C:\\WINDOWS\\System32\\iasrecst.dll"

[HKEY_CLASSES_ROOT\CLSID\{6BC09692-0CE6-11D1-BAAE-00C04FC2E20D}]
"AppID"="{A5CEB593-CCC3-486B-AB91-9C5C5ED4C9E1}"
@="IAS Attribute Dictionary"

[HKEY_CLASSES_ROOT\CLSID\{6BC09692-0CE6-11D1-BAAE-00C04FC2E20D}\InprocServer32]
"ThreadingModel"="Free"
@="C:\\WINDOWS\\System32\\iasrecst.dll"
Very Important!

You then need to "re-register" a DLL which may have become unbound by some other software removal, which is referenced in the REG patch above. (as far as I can tell its the SQLquery tool that RRAS needs to get at the records in the database tables in the .mdb files)
regsvr32 C:\WINDOWS\System32\iasrecst.dll
Not done Yet!

The registry branch for the

HKLM\System\ControlSet001\Services\RemoteAccess
I put a copy of mine at the bottom of this blog post.

After the above, and a reboot for good measure.

You can RT Click [My Network Places] > Properties

Then DB Click [New Connection Wizard]


Get a list of available Inbound Connectors, Ethernet Cards, Modems Ect..


Choose whether to Modify the Firewall to allow VPN connections (I think its IPSEC)


Pick existing Windows user accounts to Auth Incoming Connection Attempts, or create new ones


Pick a networking stack over which to conduct the Auth exchange


And complete the RRAS connection type


The new type shows up in RT Click > Properties for [Network Connections]


The Properties of the New Connection type reveal its configuration settings


May need to be reset to a known condition, this is mine (its more or less an out of the box example):

You  need to backup your existing registry branch (for RemoteAccess) or perform a system restore "point" (or backup) in case this doesn't work for you and you want to back out the changes.

Windows Registry Editor Version 5.00

[HKEY_LOCAL_MACHINE\SYSTEM\ControlSet001\Services\RemoteAccess]
"Type"=dword:00000020
"Start"=dword:00000003
"ErrorControl"=dword:00000001
"ImagePath"=hex(2):25,00,53,00,79,00,73,00,74,00,65,00,6d,00,52,00,6f,00,6f,00,\
  74,00,25,00,5c,00,73,00,79,00,73,00,74,00,65,00,6d,00,33,00,32,00,5c,00,73,\
  00,76,00,63,00,68,00,6f,00,73,00,74,00,2e,00,65,00,78,00,65,00,20,00,2d,00,\
  6b,00,20,00,6e,00,65,00,74,00,73,00,76,00,63,00,73,00,00,00
"DisplayName"="Routing and Remote Access"
"DependOnService"=hex(7):52,00,70,00,63,00,53,00,53,00,00,00,00,00
"DependOnGroup"=hex(7):4e,00,65,00,74,00,42,00,49,00,4f,00,53,00,47,00,72,00,\
  6f,00,75,00,70,00,00,00,00,00
"ObjectName"="LocalSystem"
"Description"="Offers routing services to businesses in local area and wide area network environments."
@=""

[HKEY_LOCAL_MACHINE\SYSTEM\ControlSet001\Services\RemoteAccess\Accounting]
"AccountSessionIdStart"=dword:00000003

[HKEY_LOCAL_MACHINE\SYSTEM\ControlSet001\Services\RemoteAccess\Accounting\Providers]
"ActiveProvider"="{1AA7F846-C7F5-11D0-A376-00C04FC9DA04}"

[HKEY_LOCAL_MACHINE\SYSTEM\ControlSet001\Services\RemoteAccess\Accounting\Providers\{1AA7F840-C7F5-11D0-A376-00C04FC9DA04}]
"ConfigClsid"="{1AA7F840-C7F5-11D0-A376-00C04FC9DA04}"
"DisplayName"="RADIUS Accounting"
"Path"=hex(2):25,00,53,00,79,00,73,00,74,00,65,00,6d,00,52,00,6f,00,6f,00,74,\
  00,25,00,5c,00,53,00,79,00,73,00,74,00,65,00,6d,00,33,00,32,00,5c,00,72,00,\
  61,00,73,00,72,00,61,00,64,00,2e,00,64,00,6c,00,6c,00,00,00
"ProviderTypeGUID"="{76560D80-2BFD-11d2-9539-3078302C2030}"
"VendorName"="Microsoft"

[HKEY_LOCAL_MACHINE\SYSTEM\ControlSet001\Services\RemoteAccess\Accounting\Providers\{1AA7F846-C7F5-11D0-A376-00C04FC9DA04}]
"ConfigClsid"=""
"DisplayName"="Windows Accounting"
"Path"=hex(2):25,00,53,00,79,00,73,00,74,00,65,00,6d,00,52,00,6f,00,6f,00,74,\
  00,25,00,5c,00,53,00,79,00,73,00,74,00,65,00,6d,00,33,00,32,00,5c,00,6d,00,\
  70,00,72,00,64,00,64,00,6d,00,2e,00,64,00,6c,00,6c,00,00,00
"ProviderTypeGUID"="{76560D81-2BFD-11d2-9539-3078302C2030}"
"VendorName"="Microsoft"

[HKEY_LOCAL_MACHINE\SYSTEM\ControlSet001\Services\RemoteAccess\Authentication]

[HKEY_LOCAL_MACHINE\SYSTEM\ControlSet001\Services\RemoteAccess\Authentication\Providers]
"ActiveProvider"="{1AA7F841-C7F5-11D0-A376-00C04FC9DA04}"

[HKEY_LOCAL_MACHINE\SYSTEM\ControlSet001\Services\RemoteAccess\Authentication\Providers\{1AA7F83F-C7F5-11D0-A376-00C04FC9DA04}]
"ConfigClsid"="{1AA7F83F-C7F5-11D0-A376-00C04FC9DA04}"
"DisplayName"="RADIUS Authentication"
"Path"=hex(2):25,00,53,00,79,00,73,00,74,00,65,00,6d,00,52,00,6f,00,6f,00,74,\
  00,25,00,5c,00,53,00,79,00,73,00,74,00,65,00,6d,00,33,00,32,00,5c,00,72,00,\
  61,00,73,00,72,00,61,00,64,00,2e,00,64,00,6c,00,6c,00,00,00
"VendorName"="Microsoft"
"ProviderTypeGUID"="{76560D00-2BFD-11d2-9539-3078302C2030}"

[HKEY_LOCAL_MACHINE\SYSTEM\ControlSet001\Services\RemoteAccess\Authentication\Providers\{1AA7F841-C7F5-11D0-A376-00C04FC9DA04}]
"ConfigClsid"=""
"DisplayName"="Windows Authentication"
"Path"=hex(2):25,00,53,00,79,00,73,00,74,00,65,00,6d,00,52,00,6f,00,6f,00,74,\
  00,25,00,5c,00,53,00,79,00,73,00,74,00,65,00,6d,00,33,00,32,00,5c,00,6d,00,\
  70,00,72,00,64,00,64,00,6d,00,2e,00,64,00,6c,00,6c,00,00,00
"VendorName"="Microsoft"
"ProviderTypeGUID"="{76560D01-2BFD-11d2-9539-3078302C2030}"

[HKEY_LOCAL_MACHINE\SYSTEM\ControlSet001\Services\RemoteAccess\DemandDialManager]
"DllPath"=hex(2):25,00,53,00,79,00,73,00,74,00,65,00,6d,00,52,00,6f,00,6f,00,\
  74,00,25,00,5c,00,53,00,79,00,73,00,74,00,65,00,6d,00,33,00,32,00,5c,00,6d,\
  00,70,00,72,00,64,00,64,00,6d,00,2e,00,64,00,6c,00,6c,00,00,00

[HKEY_LOCAL_MACHINE\SYSTEM\ControlSet001\Services\RemoteAccess\Interfaces]
"Stamp"=dword:00000000

[HKEY_LOCAL_MACHINE\SYSTEM\ControlSet001\Services\RemoteAccess\Interfaces\0]
"InterfaceName"="Loopback"
"Type"=dword:00000005
"Enabled"=dword:00000001
"Stamp"=dword:00000000

[HKEY_LOCAL_MACHINE\SYSTEM\ControlSet001\Services\RemoteAccess\Interfaces\0\Ip]
"ProtocolId"=dword:00000021
"InterfaceInfo"=hex:01,00,00,00,68,00,00,00,03,00,00,00,05,00,ff,ff,38,00,00,\
  00,00,00,00,00,40,00,00,00,04,00,ff,ff,04,00,00,00,01,00,00,00,40,00,00,00,\
  07,00,ff,ff,10,00,00,00,01,00,00,00,48,00,00,00,00,00,00,00,01,00,00,00,00,\
  00,00,00,58,02,c2,01,08,07,00,00,00,00,00,00,00,00,00,00,00,00,00,00,00,00,\
  00,00,00,00,00,00,00,00,00,00

[HKEY_LOCAL_MACHINE\SYSTEM\ControlSet001\Services\RemoteAccess\Interfaces\1]
"InterfaceName"="Internal"
"Type"=dword:00000004
"Enabled"=dword:00000001
"Stamp"=dword:00000000

[HKEY_LOCAL_MACHINE\SYSTEM\ControlSet001\Services\RemoteAccess\Interfaces\1\Ip]
"ProtocolId"=dword:00000021
"InterfaceInfo"=hex:01,00,00,00,68,00,00,00,03,00,00,00,05,00,ff,ff,38,00,00,\
  00,00,00,00,00,40,00,00,00,04,00,ff,ff,04,00,00,00,01,00,00,00,40,00,00,00,\
  07,00,ff,ff,10,00,00,00,01,00,00,00,48,00,00,00,00,00,00,00,01,00,00,00,00,\
  00,00,00,58,02,c2,01,08,07,00,00,00,00,00,00,00,00,00,00,00,00,00,00,00,00,\
  00,00,00,00,00,00,00,00,00,00

[HKEY_LOCAL_MACHINE\SYSTEM\ControlSet001\Services\RemoteAccess\Interfaces\2]
"InterfaceName"="{27A054EB-CD1B-4B1F-9155-4870F6D2F7F0}"
"Type"=dword:00000003
"Enabled"=dword:00000001
"Stamp"=dword:00000000

[HKEY_LOCAL_MACHINE\SYSTEM\ControlSet001\Services\RemoteAccess\Interfaces\2\Ip]
"ProtocolId"=dword:00000021
"InterfaceInfo"=hex:01,00,00,00,68,00,00,00,03,00,00,00,05,00,ff,ff,38,00,00,\
  00,00,00,00,00,40,00,00,00,04,00,ff,ff,04,00,00,00,01,00,00,00,40,00,00,00,\
  07,00,ff,ff,10,00,00,00,01,00,00,00,48,00,00,00,00,00,00,00,01,00,00,00,00,\
  00,00,00,58,02,c2,01,08,07,00,00,00,00,00,00,00,00,00,00,00,00,00,00,00,00,\
  00,00,00,00,00,00,00,00,00,00

[HKEY_LOCAL_MACHINE\SYSTEM\ControlSet001\Services\RemoteAccess\Interfaces\3]
"InterfaceName"="{2997EDE8-4DF4-4409-BF1D-E35E6F580C2F}"
"Type"=dword:00000003
"Enabled"=dword:00000001
"Stamp"=dword:00000000

[HKEY_LOCAL_MACHINE\SYSTEM\ControlSet001\Services\RemoteAccess\Interfaces\3\Ip]
"ProtocolId"=dword:00000021
"InterfaceInfo"=hex:01,00,00,00,68,00,00,00,03,00,00,00,05,00,ff,ff,38,00,00,\
  00,00,00,00,00,40,00,00,00,04,00,ff,ff,04,00,00,00,01,00,00,00,40,00,00,00,\
  07,00,ff,ff,10,00,00,00,01,00,00,00,48,00,00,00,00,00,00,00,01,00,00,00,00,\
  00,00,00,58,02,c2,01,08,07,00,00,00,00,00,00,00,00,00,00,00,00,00,00,00,00,\
  00,00,00,00,00,00,00,00,00,00

[HKEY_LOCAL_MACHINE\SYSTEM\ControlSet001\Services\RemoteAccess\Parameters]
"RouterType"=dword:00000001
"ServerFlags"=dword:00802702
"ServiceDll"=hex(2):25,00,53,00,79,00,73,00,74,00,65,00,6d,00,52,00,6f,00,6f,\
  00,74,00,25,00,5c,00,53,00,79,00,73,00,74,00,65,00,6d,00,33,00,32,00,5c,00,\
  6d,00,70,00,72,00,64,00,69,00,6d,00,2e,00,64,00,6c,00,6c,00,00,00

[HKEY_LOCAL_MACHINE\SYSTEM\ControlSet001\Services\RemoteAccess\Parameters\AccountLockout]
"MaxDenials"=dword:00000000
"ResetTime (mins)"=dword:00000b40

[HKEY_LOCAL_MACHINE\SYSTEM\ControlSet001\Services\RemoteAccess\Parameters\AppleTalk]
"EnableIn"=dword:00000001

[HKEY_LOCAL_MACHINE\SYSTEM\ControlSet001\Services\RemoteAccess\Parameters\Ip]
"AllowClientIpAddresses"=dword:00000000
"AllowNetworkAccess"=dword:00000001
"EnableIn"=dword:00000001
"IpAddress"="0.0.0.0"
"IpMask"="0.0.0.0"
"UseDhcpAddressing"=dword:00000001
"EnableNetbtBcastFwd"=dword:00000001

[HKEY_LOCAL_MACHINE\SYSTEM\ControlSet001\Services\RemoteAccess\Parameters\Ip\StaticAddressPool]

[HKEY_LOCAL_MACHINE\SYSTEM\ControlSet001\Services\RemoteAccess\Parameters\Ip\StaticAddressPool\0]
"From"=dword:00000000
"To"=dword:00000000

[HKEY_LOCAL_MACHINE\SYSTEM\ControlSet001\Services\RemoteAccess\Parameters\Ipx]
"EnableIn"=dword:00000001
"AcceptRemoteNodeNumber"=dword:00000001
"AllowNetworkAccess"=dword:00000001
"AutoWanNetAllocation"=dword:00000001
"FirstWanNet"=dword:00000000
"GlobalWanNet"=dword:00000001
"LastWanNet"=dword:00000000
"WanNetPoolSize"=dword:000003e8

[HKEY_LOCAL_MACHINE\SYSTEM\ControlSet001\Services\RemoteAccess\Parameters\Nbf]
"EnableIn"=dword:00000001
"AllowNetworkAccess"=dword:00000001

[HKEY_LOCAL_MACHINE\SYSTEM\ControlSet001\Services\RemoteAccess\Performance]
"Open"="OpenRasPerformanceData"
"Close"="CloseRasPerformanceData"
"Collect"="CollectRasPerformanceData"
"Library"=hex(2):25,00,53,00,79,00,73,00,74,00,65,00,6d,00,52,00,6f,00,6f,00,\
  74,00,25,00,5c,00,53,00,79,00,73,00,74,00,65,00,6d,00,33,00,32,00,5c,00,72,\
  00,61,00,73,00,63,00,74,00,72,00,73,00,2e,00,64,00,6c,00,6c,00,00,00
"First Counter"=dword:000007de
"First Help"=dword:000007df
"Last Help"=dword:00000805
"Last Counter"=dword:00000804
"WbemAdapFileSignature"=hex:b0,b0,d7,90,5a,c7,1b,c2,78,f1,7f,45,5e,18,26,11
"WbemAdapFileTime"=hex:00,a0,a1,10,27,9e,c8,01
"WbemAdapFileSize"=dword:00002e00
"WbemAdapStatus"=dword:00000000

[HKEY_LOCAL_MACHINE\SYSTEM\ControlSet001\Services\RemoteAccess\Policy]
"ProductDir"="C:\\WINDOWS\\system32\\IAS"

[HKEY_LOCAL_MACHINE\SYSTEM\ControlSet001\Services\RemoteAccess\Policy\Pipeline]

[HKEY_LOCAL_MACHINE\SYSTEM\ControlSet001\Services\RemoteAccess\Policy\Pipeline\01]
@="IAS.ProxyPolicyEnforcer"
"Requests"="0 1 2"
"Responses"="0 1 2 3 4"

[HKEY_LOCAL_MACHINE\SYSTEM\ControlSet001\Services\RemoteAccess\Policy\Pipeline\02]
@="IAS.NTSamNames"
"Providers"="1"
"Requests"="0"
"Responses"="0 1 3"

[HKEY_LOCAL_MACHINE\SYSTEM\ControlSet001\Services\RemoteAccess\Policy\Pipeline\03]
@="IAS.BaseCampHost"
"Requests"="0 1"
"Responses"="0 1 2 4"

[HKEY_LOCAL_MACHINE\SYSTEM\ControlSet001\Services\RemoteAccess\Policy\Pipeline\04]
@="IAS.RadiusProxy"
"Providers"="2"
"Responses"="0"

[HKEY_LOCAL_MACHINE\SYSTEM\ControlSet001\Services\RemoteAccess\Policy\Pipeline\05]
@="IAS.NTSamAuthentication"
"Providers"="1"
"Requests"="0"
"Responses"="0"

[HKEY_LOCAL_MACHINE\SYSTEM\ControlSet001\Services\RemoteAccess\Policy\Pipeline\06]
@="IAS.AccountValidation"
"Providers"="1"
"Requests"="0"
"Responses"="0 1"
"Reasons"="33"

[HKEY_LOCAL_MACHINE\SYSTEM\ControlSet001\Services\RemoteAccess\Policy\Pipeline\07]
@="IAS.PolicyEnforcer"
"Providers"="1"
"Requests"="0"
"Responses"="0 1 3"
"Reasons"="33"

[HKEY_LOCAL_MACHINE\SYSTEM\ControlSet001\Services\RemoteAccess\Policy\Pipeline\08]
@="IAS.NTSamPerUser"
"Providers"="1"
"Requests"="0"
"Responses"="0 1 3"
"Reasons"="33"

[HKEY_LOCAL_MACHINE\SYSTEM\ControlSet001\Services\RemoteAccess\Policy\Pipeline\09]
@="IAS.EAP"
"Providers"="1"
"Requests"="0 2"
"Responses"="0"

[HKEY_LOCAL_MACHINE\SYSTEM\ControlSet001\Services\RemoteAccess\Policy\Pipeline\10]
@="IAS.URHandler"
"Providers"="0 1"
"Requests"="0 2"
"Responses"="0 1"
"Reasons"="33"

[HKEY_LOCAL_MACHINE\SYSTEM\ControlSet001\Services\RemoteAccess\Policy\Pipeline\11]
@="IAS.ChangePassword"
"Providers"="1"
"Requests"="0"
"Responses"="0 1"

[HKEY_LOCAL_MACHINE\SYSTEM\ControlSet001\Services\RemoteAccess\Policy\Pipeline\12]
@="IAS.AuthorizationHost"
"Requests"="0 1 2"
"Responses"="0 1 2 4"

[HKEY_LOCAL_MACHINE\SYSTEM\ControlSet001\Services\RemoteAccess\Policy\Pipeline\13]
@="IAS.Accounting"

[HKEY_LOCAL_MACHINE\SYSTEM\ControlSet001\Services\RemoteAccess\Policy\Pipeline\14]
@="IAS.MSChapErrorReporter"
"Providers"="0 1"
"Requests"="0"
"Responses"="2"

[HKEY_LOCAL_MACHINE\SYSTEM\ControlSet001\Services\RemoteAccess\RouterManagers]
"Stamp"=dword:00000000

[HKEY_LOCAL_MACHINE\SYSTEM\ControlSet001\Services\RemoteAccess\RouterManagers\Ip]
"ProtocolId"=dword:00000021
"GlobalInfo"=hex:01,00,00,00,80,00,00,00,02,00,00,00,03,00,ff,ff,08,00,00,00,\
  01,00,00,00,30,00,00,00,06,00,ff,ff,3c,00,00,00,01,00,00,00,38,00,00,00,00,\
  00,00,00,00,00,00,00,01,00,00,00,07,00,00,00,02,00,00,00,01,00,00,00,03,00,\
  00,00,0a,00,00,00,16,27,00,00,03,00,00,00,17,27,00,00,05,00,00,00,12,27,00,\
  00,07,00,00,00,0d,00,00,00,6e,00,00,00,08,00,00,00,78,00,00,00,00,00,00,00,\
  00,00,00,00,00,00,00,00
"DLLPath"=hex(2):25,00,53,00,79,00,73,00,74,00,65,00,6d,00,52,00,6f,00,6f,00,\
  74,00,25,00,5c,00,53,00,79,00,73,00,74,00,65,00,6d,00,33,00,32,00,5c,00,69,\
  00,70,00,72,00,74,00,72,00,6d,00,67,00,72,00,2e,00,64,00,6c,00,6c,00,00,00

[HKEY_LOCAL_MACHINE\SYSTEM\ControlSet001\Services\RemoteAccess\RoutingTableManager]

[HKEY_LOCAL_MACHINE\SYSTEM\ControlSet001\Services\RemoteAccess\RoutingTableManager\Instance 00000]

[HKEY_LOCAL_MACHINE\SYSTEM\ControlSet001\Services\RemoteAccess\RoutingTableManager\Instance 00000\AddressFamily 00002]
"AddressSize"=dword:00000004
"ViewsSupported"=dword:00000003
"MaxChangeNotifyRegistrations"=dword:00000010
"MaxOpaqueInfoPointers"=dword:00000005
"MaxNextHopsInRoute"=dword:00000003
"MaxHandlesReturnedInEnum"=dword:00000019

[HKEY_LOCAL_MACHINE\SYSTEM\ControlSet001\Services\RemoteAccess\Security]
"Security"=hex:01,00,14,80,90,00,00,00,9c,00,00,00,14,00,00,00,30,00,00,00,02,\
  00,1c,00,01,00,00,00,02,80,14,00,ff,01,0f,00,01,01,00,00,00,00,00,01,00,00,\
  00,00,02,00,60,00,04,00,00,00,00,00,14,00,fd,01,02,00,01,01,00,00,00,00,00,\
  05,12,00,00,00,00,00,18,00,ff,01,0f,00,01,02,00,00,00,00,00,05,20,00,00,00,\
  20,02,00,00,00,00,14,00,8d,01,02,00,01,01,00,00,00,00,00,05,0b,00,00,00,00,\
  00,18,00,fd,01,02,00,01,02,00,00,00,00,00,05,20,00,00,00,23,02,00,00,01,01,\
  00,00,00,00,00,05,12,00,00,00,01,01,00,00,00,00,00,05,12,00,00,00

[HKEY_LOCAL_MACHINE\SYSTEM\ControlSet001\Services\RemoteAccess\Enum]
"0"="Root\\LEGACY_REMOTEACCESS\\0000"
"Count"=dword:00000001
"NextInstance"=dword:00000001

12/18/2016

SL4NT, a good Syslog daemon for Windows

Syslog is a standard for logging messages from an operating system by urgency (priority) and program source (facility) and a free form string of information. Its very common on unix/linux, but not so common on Windows. Microsoft has no such native service provider. There are a lot of things that don't run windows and its nice to be able to "listen" to them when monitoring or debugging. SL4NT is a venerable daemon with Control Panel or Microsoft Management Console consoles for starting, stopping and configuring a native Windows Service that provides the Syslog feature on many versions of Windows. Its available as Freeware or Full support Commercial software with price breaks for volume and site licenses.

The Freeware version called 0.3 covers only the basics but is quite useful.


It comes as two binaries:

SNL3NT.CPL - the control panel applet
SNL4NT.EXE - the service installer and remover

The Full service version comes with a Microsoft Management Console plug-in and an InstallShield installer. There is a 60 day trial period after which you need to consider purchasing a singular/volume or site license.

It is somewhat feature rich, and will work on anything from NT up through Windows 7 (that I have tested) and reportedly through Windows 2012R2. (you should apply the Service Pak for SL4NT to run on Windows Vista, Windows 7, 2008, 2012 or 2012R2 - otherwise the MMC will be unable to start and stop the service, its a manual affair - stop the daemon manually and copy the patch files over the installed files in the install bin directory).


You create Actions in the Action Tab of the Properties editor, reached by right clicking on a server in the MMC Console.


Then edit Rules in the Rules Tab to (filter) Syslog messages and apply Actions to them.


other Tabs allow you to:
  • specify the LOG format
  • specify which ports and protocol types (udp/tcp) to listen on
  • specify SMTP server settings to perform notification Actions
  • specify Viewer options to host a Telnet service on a port that allows selecting a stream of incoming Syslog messages - basically you telnet to a designated port, then use a cmdline language to choose a port to "listen" to and start seeing syslog messages scroll by in your Telnet session. (this can be used by Windows clients or Unix/Linux clients)
  • specify Other - Event log capture options for Syslog priority messages
An optional CLSyslog - command line called clstest.exe can be downloaded separately and run from a CMD prompt to connect to a Syslog server and test the service. Usage instructions are provided when insufficent arguments are provided.

The CLSyslog tool is actually part of a larger free "kit" for adding Syslog capabilities to your Windows applications and programs in as minimal and simplistic a way as possible. It comes with a simple header file, two very small dynamic libraries (.dll's) and C source code for the CLSyslog test program.

The author appears to come from Austria and the licensing options are automated through an online commerce group.


The organization and presentation of the suite is quite good. The help documents finely tuned and accurate. The english language descriptions and cues unbelievably good.

I believe the package has been around for more than 20 years and has been kept up to date. It is one hundred percent "by the book" with regards to Microsoft User Interface guidelines.

Some may see the name [SL4NT] somewhat old and the user interface time honored or even dated, but familarity breeds confidence and reliability. Experience brings stability and makes the programs a joy to use.

I can't think of any thing other than the familar "spreadsheet" browser interface tacked on too many "filter viewers" for digging through logs.. which I think should really be honed as a separate tool rather than jammed into the same one dedicated to providing a service.

Its also notable that as an MMC the same tool can reach out and manage multiple Syslog servers across your network, for redundancy, or to spread the log collecting load across more machines. Ethernet still has its limitations bandwidth wise and occassionally spreading the load leads to a more accurate logging cluster.

One thing I found "unintuitive" was that to use the live Viewer in a telnet window. You needed to declare an Action on the Action Tab, then add that Action to a Rule on the Rule Tab which "filters" Syslog messages and decides which Rules to apply. Syslog messages can be pushed or forwarded to both a Viewer "channel" and a Log at the same time. Once I did this, I telnet'd into the service port over TCP and used the command +#<channel number> or +#1 to connect my Telnet "Viewer" to the Live View channel and used the command line CLSyslog program to send my localhost a priority message from a facility with a test string of text. -- I should mention the Viewer "presentation" of the Syslog fields is also customizable, so as many or as few of the available fields can be monitored in a Viewer channel as desired. This screenshot is merely the default for a Viewer channel.


And do not forget to "disable" or otherwise modify your Windows Firewall to allow communications with port UDP 514. If you configure your Syslog clients to send their messages to your Windows desktop or server. This cost me a bit of time since I was successful using the CLSyslog command testing from the Windows machine running SL4NT and I forgot the Windows firewall will deny access to traffic from the outside and discard it silently.  -- Since Syslog uses UDP by default its considered "best effort" and lost traffic is not reported as unsuccessful on the client end.

Usually if all is configured correctly the client will forward some sort of Cold Start or Warm Start message when rebooted. -- Also remember the LOG format for file logs and Viewer channel presentation is independently "customizable" and not all Syslog fields will be shown in each default format.. you can tailor it however you wish.


12/04/2016

RHEL5, rhgb change resolutions, show details


The rhgb - (red hat graphical boot launcher) is an old method for displaying or hiding details about run control scripts during start up for the Red Hat Linux operating system. There isn't a lot of clear documentation about it. This is how to adjust its resolution if it looks odd at boot time.


Basically its a set of two binaries that live in /usr/bin named [rhgb] and [rhgb-client]

rhgb - is run by the /etc/rc.sysinit script which looks for an xorg.conf file in its working directory


If it finds xorg.conf then it uses that information to start an Xwindows terminal and displays a set of default graphics including a progress bar, logos and a Gnome VTE - (virtual terminal emulator) widget with details and progress information.

The run control scripts send updates to the rhgb by pipes in its working directory temp folder using the rhgb-client

Normally the /etc/rhgb working path does not contain an xorg.conf file and the rhgb agent does the best it can to discover and create a working configuration in memory. Sometimes this works, sometimes it fails.

Under virtualbox vm emulation for example the rhgb autoconfiguration gets it mostly right, but the vte widget is displayed off center and bleeds off the display to the right.

By copying the /etc/X11/xorg.conf.virtualbox configuration to the /etc/rghb/xorg.conf file and "tweaking" it this problem can be completely eliminated. Mostly the key was the selection of the default "driver" used by the xerver (it has to be "vesa") and setting up Inputs to represent the mouse.

But an Input device is really only needed if you intend to toggle the Show Details or Hide Details arrow next to the progress bar.

If you want to "permenantly" [Show Details] without having to toggle the arrow.

You then need to edit the /etc/rc.sysinit script and find the line where the rhgb command is called to start the xserver. Its on line 361 on my system and looks like this:
361 if strstr "$cmdline" rhgb && ! strstr "$cmdline" early-login
After the line
363    RHGB_STARTED=1
 Add
364    rhgb-client --details=yes
This simply sends a command to the rhgb agent to always display details and is equivalent to toggling the on screen arrow during boot.

This provided the information to figure out that rhgb does have a resolution configuration file:

/usr/share/doc/rhgb-0.16.4/HOW_IT_WORKS


This provided the suggestion of how to flip the switch for Show Details:

Show Details on Bootup

Here is my /etc/rhgb/xorg.conf file:

# Xorg configuration created by system-config-display

Section "ServerLayout"
        Identifier     "single head configuration"
        Screen      0  "Screen0" 0 0
        InputDevice    "Keyboard0" "CoreKeyboard"
        InputDevice  "Mouse[1]" "CorePointer"
        InputDevice  "Mouse[2]" "SendCoreEvents"
EndSection

Section "InputDevice"
        Identifier  "Keyboard0"
        Driver      "kbd"
        Option      "XkbModel" "pc105"
        Option      "XkbLayout" "us"
EndSection

Section "InputDevice"
  Driver       "mouse"
  Identifier   "Mouse[1]"
  Option       "Buttons" "9"
  Option       "Device" "/dev/input/mice"
  Option       "Name" "VirtualBox Mouse Buttons"
  Option       "Protocol" "explorerps/2"
  Option       "Vendor" "Oracle Corporation"
  Option       "ZAxisMapping" "4 5"
  Option       "CorePointer"
EndSection

Section "InputDevice"
  Driver       "vboxmouse"
  Identifier   "Mouse[2]"
  Option       "Device" "/dev/vboxguest"
  Option       "Name" "VirtualBox Mouse"
  Option       "Vendor" "Oracle Corporation"
  Option       "SendCoreEvents"
EndSection


Section "Monitor"

 ### Comment all HorizSync and VertSync values to use DDC:
        Identifier   "Monitor0"
        ModelName    "LCD Panel 1280x800"
 ### Comment all HorizSync and VertSync values to use DDC:
        HorizSync    31.5 - 50.0
        VertRefresh  56.0 - 65.0
        Option      "dpms"
EndSection

Section "Device"
        Identifier  "Videocard0"
        Driver      "vesa"
EndSection

Section "Screen"
        Identifier "Screen0"
        Device     "Videocard0"
        Monitor    "Monitor0"
        DefaultDepth    16
        SubSection "Display"
                Viewport   0 0
                Depth     16
                Modes     "1024x768"
        EndSubSection
EndSection


12/03/2016

Virtualbox, expanding a rhel vm guest

Oracle virtualbox can assemble a vm from many different types of virtual disk images, raw, vmdk or vdi are examples. Sometimes however a vm guest can grow in its need for disk space and you have to expand the size of its virtual disk. This is a method to do that for RHEL5 as a vm guest on windows 7.


A raw disk is an image of an existing machine taken using something like the # dd command to capture the content of physical disk blocks and pack them into a portable file, usually with the extension .raw

A raw disk can be converted into a vmdk (a popular virtual disk format with VMware) using many different tools, one is the fully graphical windows tool from StarWind software.

It can be used as a vmdk for some time as part of a vm created using the virtual machine manager that comes with Oracles Virtualbox software. Then the vmdk virtual disk can fill up.

To get more disk space several concepts must be addressed.

First the outside pseudo-physical container needs to be enlarged.

Virtualbox tools do not support enlarging a vmdk file format, they do support enlarging its native .vdi file format. And the Virtualbox tools can "clone" or simultaneoulsy "copy and convert" from a .vmdk file format to a .vdi file format using the Virtualbox Media Manager menu.

 
Then the commandline version of the Virtualbox tools VirtualboxManager can be used to ["resize"] the .vdi to a larger version. The "resize" argument is the final disk size, so it should be larger than the current size


Once this is done.

0%... 10%... 20%... 30%... 40%... 50%... 60%... 70%... 80%... 90%... 100%

The RHEL5 vm guest inside the image needs to be re-partitioned. Current tools for RHEL5 cannot repartition an installed instance in a vm guest. So a graphical disk partitioner, which is aware of  LVM2 disk partitions is downloaded as a bootable .iso image and attached to the RHEL5 vm guest using the Virtualbox virtual machine tools and booted.


Gparted is semi-intuitive, first the existing partitions are "recognized" and displayed with a color coded legend. Its important that any re-partioner properly identifies and "recognizes" the existing partitions so they are not accidently damaged or erased during the re-partitioning procedure. RHEL5 vm guests typically have a tiny ext2 /boot partition, and a larger LVM2 partion. called a "VolumeGroup", inside are two "smaller, but still very large" volume group - "logical" partitions.


The purpose of the VolumeGroup is so that the upper partitions can "float" or continue to exist while switching out and manipulating or "maintaining" storage disks underneath. A single MBR partition can be use, a single physical disk can be used, or multiple disks - as in a RAID configuration. Failed disks can be swapped in/out and replaced, more disks can be added to enlarge a volume group or even removed to shrink the volume group. -- The "floating" logical paritions "above" the LVM2 partition are completely unaware of the lower "volume group" activities.

In this case we use the Gparted to "resize" the VolumeGroup to make room for enlarging the logical partitions "floating" above the LVM2 partition. GParted does not display the "logical volumes" within the LVM2 Volgroup partition, these have to be manipulated using tools from within the vm guest after it is booted.

Gparted works on the principal of "describe what you want to do" as a series of steps, then "activate" or "apply". This gives you the chance to design how you want the final arrangement of LVM2 partitions and volume groups laid are out and then "commit" the changes to actual disk hardware.
Originally smaller hard disks used a scheme called MBR (master boot record) with tiny fields for describing the partitions on disk. This predated LVM2 (logical volume manager v2) and hard disk sizes continued to grow larger. So large, that describing their size would no longer fit in the tiny MBR "partition size" number fields. So hard disks began being "described" with a new scheme called GPT, which had larger number fields, larger partitions could fit in the new GPT number fields.. but old partitioning software would sometimes see the hard disk as "blank" or "empty" and inadvertently wipe the disks of existing information (this was bad). So new GPT schemes tend to hybridize "both" designs and throw a phoney or "fake" MBR at the top of the drive and "real" GPT  partition records further into the disk. The "fake" MBR partition records  simply say [This Disk "Unclean".. fully used.. Don't Touch Me!]. -- That way older MBR software will generally refuse to work with the disk until the user takes extra steps to destroy their data themselves [first]... they were warned.
Gparted understands GPT formatted disks, which has become the norm. Linux however is started with a bootloader which is ancient and only understands MBR formatted disks, so it has one MBR style partition at the shallow end of the disk, way at the Top; a tiny partition normally mounted to /boot and that is the ext2 partition at the top of the disk.

The second MBR (or first GPT "sized" partition) is the singular "volume group" used by LVM2 to support - or "float"- the two "logical paritions" inside of it, [swap] and [/ (root)] - we are trying to enlarge the second logical partition inside the second MBR "fake"partition which is actually a GPT partition backing the singular volume group.

I like to think of LVM2 partitions as "logical data volume Islands in the Sky".. hello Stratos
Gparted is used to mount and see all that is going on. The Virtualbox machine manager tools already resized the .vdi disk image to a larger size. Gparted is used to enlarge the second MBR, GPT partition supporting the LVM2 volume group. Gparted allows you to select the GPT or volume group partition and drag it to resize it to use all of the newly available virtual disk space. Then the proposed changes are committed to disk with [Apply].


Shutdown and unmount the Gparted .iso from the virtual machine.

Boot the vm guest, start the gui [logical volume] manager tool from the gnome administrative menu. It should see the volume group  the [/ (root)] "file system" resides in.. has new space available.. drag to resize and commit the changes.


Blue Logical Partitions - red shows blocks in LVM2 making up selected Blue Logical Partition


Logical Volume "00" is the / (root)  filesystem - Edit allows "adding" blocks to grow in Size

This gui tool also simultaneously "adjusts" the filesystem and formats the new blocks [without] "destroying" the data on the existing blocks of the Logical Partition, and "notifies" the operating system.. so that the new filespace is immediately available to use... without a reboot.


RHEL5, gdm autologin as root

The gnome desktop manager will disregard a gdm/custom.conf configuration to automatically login as the root user and present a standard greeter prompt instead. Normally configuring gdm to autologin as any user other than the root user would not prompt for a password and simply login and present a default graphical desktop. Here is how to configure gdm to autologin as the root user.


create a new regular user account

# useradd testuser

run gdmsetup from a desktop cmdline window,
or use the the gui tool [System]/[Administration]/[Login Screen]


select the [Security] tab
check the [v/] Enable Automatic Login
enter: the  new regular user account

under [Security]
check: Allow local system administrator login
check: Allow remote system administrator login
press [x][Close] to save the changes

edit the /etc/passwd file and make the following changes:

change the uid for the testuser to [0]
change the gid for the testuser to [0]
change the home directory path  [/root]


save the file

reboot

the system will automatically boot into a gnome windows desktop with root privileges

The reason this works is the uid and gid are the same as the root user. Whatever coding intervention prevents the autologon procedure from continuing appears to only inspect the username and not the uid or the gid.

So setting the enabled Automatic Login "user" to something other than "root" is [allowed] and continues without prompting for a normal logon password. Once the session is started, every other program identifies the user as the root user and proceeds as if the root user had logged in.

This could be considered a security [bug], but its really a security "best practice" to not turn-key systems into default insecure tools. There will always be special situations that warrant moderation of a best practice for practical reasons.