10/12/2014

Nexus 5, map bluetooth control to camera app, zoom and shutter

A small Bluetooth shutter release can pair with Android and send button or key scan codes to a camera app.

Camera apps may come preconfigured to listen for scancodes that map to special Android Keycode_Events.

Like "Camera" or "ZoomIn" or they may not. Some camera apps permit settings to redefine the purpose of certain scancodes it receives from the operating system.. Like the scancodes for the Volume keys VolumeUp and VolumeDown.

These can be repurposed as ZoomUp and ZoomDown.

The task then becomes discovering the scancodes being sent by the Bluetooth remote, and configuring the app to use the keycode_events for VolumeUp and VolumeDown as Zoom controls.

First listen for scancodes and map them into key code_events... Root access is needed.

Then an app like Enhanced Keyboard Helper need to be installed to perform the mapping.

Finally a suitable Camera app like Camera FV-5 needs to be installed an its ViewFinder controls configure to respond to Volume controls.

Nexus 5, mounting a 1 TB external NTFS hdd read/write

It might come as no surprise the Google Nexus 5 phone can power and mount a 1 Terabyte WD hdd over its OTG USB port.  But


Paragon Software has also released a free APK for read/write access to existing NTFS and HFS+ partitions. This makes it possible to mount drives formatted on Windows or OSX computers directly on the device. The only barrier of entry is the filesystem auto-mounter needs to have root access to the phone.
 
NTFS & HFS+ for Android
 

Be sure to backup your data if you choose to root your phone, and consider installing an app to grant and deny root privileges to apps as needed. This is to preserve the secure access rights for only those apps that need root access.

The same 32 bit file size limits will apply at 2 GB, but the partition volume limits should be 2 TB, so mounting the entire space as one partition is possible. It might be hard to see but the NTFS auto-mounter in the preceding picture says 931.5 GB of space is now available to the phone.


I used Helium to backup my phone, but be aware it doesn't backup system preferences or any generic data that isn't directly associated with an app laying around in the file system.

Contrary to popular opinion, Helium "will" backup to a PC and restore from a PC over WiFi.

Once the Helium app is installed on the phone and the latest USB drivers from Google are installed on the desktop and the phone is set to PTP not MTP [Settings][Storage][Options][USB computer connection] > [Camera (PTP)].  The Helium desktop application will grant the Helium app on the phone developer rights to access not only the apps but their associated data for backup.

Though you might want to switch back to [Media device (MTP)] so that the phone appears as a USB storage device to your computer to copy things not associated with apps for a 'file' backup after the 'app + data' backup.

Ironically a good reason to root your phone is so that you can then perform a complete 'developers' type backup using something in a boot recovery environment, like TWRP or CWM using Nandroid that includes everything without performing multiple 'types' of 'split purpose' backups.

Additional things to consider when installing Helium so that it can backup both apps and data, is you will need to enable the developer 'menu' in settings by repeatedly tapping on the [About] menu until it makes the [ { } Developers ] menu appear to offer turning on [ USB debugging ]. This is the channel through which extra privileges will be granted to Helium for backing up the phone.

Normally the 'sandbox' security between apps and their app data, prevents one app from 'seeing' the data of another app.. so for the Helium backup app to work on the phone, it needs permission, which the USB connected Android Developer application on the Desktop 'grants'.

Backups are always good to take, but when 'rooting' .. for Personal Security sake.. before allowing 'rooting' the phone will [wipe] all personal data from the phone. If you don't have a backup to restore after the [wipe] the data will be gone.

When using the Helium app on the phone the App Options menu (upper right corner, vertical dots) offers [PC Download].

[PC Download] starts a webserver on the "phone" and presents a URL where the website can be reached by an ordinary browser on a PC connected to the WiFi network the phone is currently attached to, for example [ http://192.168.2.187:5000/ ]

Traveling there with a browser will present a web application in the browser for choosing and starting a backup of [apps and their data] or [app data (only)] keep in mind this does not include the System settings and is not a 'Total' backup. Any files uploaded to folders on the phone file system that are not app owned or created will not be backed up. To backup those files, you will need to switch back to MTP mode and access the phone as if it were an external flash or hard drive over USB and copy the files to your PC.

Helium backups can take quite a few minutes, the result is a .Zip file in the PC web browser [Downloads] folder on the PC.

The same process can be used to [Upload] a backup file for a Restoring Apps and their data to the phone, after it is "rooted".

The single biggest data risk, is that a user unaware or unaccustomed to backing up their phone data, will rush to root their phone and discover all of their data gone with no means to recover.

With a proper backup recovery plan, the next obstacle is that a freshly "rooted" phone will need much of a users attention to "recustomize" it since it has been "Reset" back to factory defaults.

Best practice is to probably "root" your phone early, if you think you might root it in the future, decide upon a backup strategy and be prepared to execute a recovery of personal data, and to re-personalize the phone after it is rooted. Since a "fresh" phone will have few differences from the factory defaults, it will require less labor while it is "fresh" than months after it has been in use.

Justifying this "procedure" may on the surface seem difficult, but there are legitimate reasons for needing access to large storage space when faced with no Internet or Network access.

Photographers and various types of people who generate or need access to historical data on-demand would find this particularly useful in the field.


10/01/2014

MySQL, format output to no-wrap


The MySQL client defaults to  stdout. If the pager ENV is set to a command with arguments it will forward the results to that command and return after it exits. The following example will truncate the columns of output to match the size of the terminal screen, the PuTTY window was resized after each query to demonstrate the effect:

mysql> pager cut -c -$COLUMNS
PAGER set to 'cut -c -$COLUMNS'


This can also be placed in ~/.my.cnf

[mysql]
pager=
cut -c -$COLUMNS

9/29/2014

USB3.0, Sustaining 88 megabytes/sec transfer rate


I have an ASUS P8Z68-V Gen3 Motherboard with USB3.0 ASMedia XHCI Host controllers.


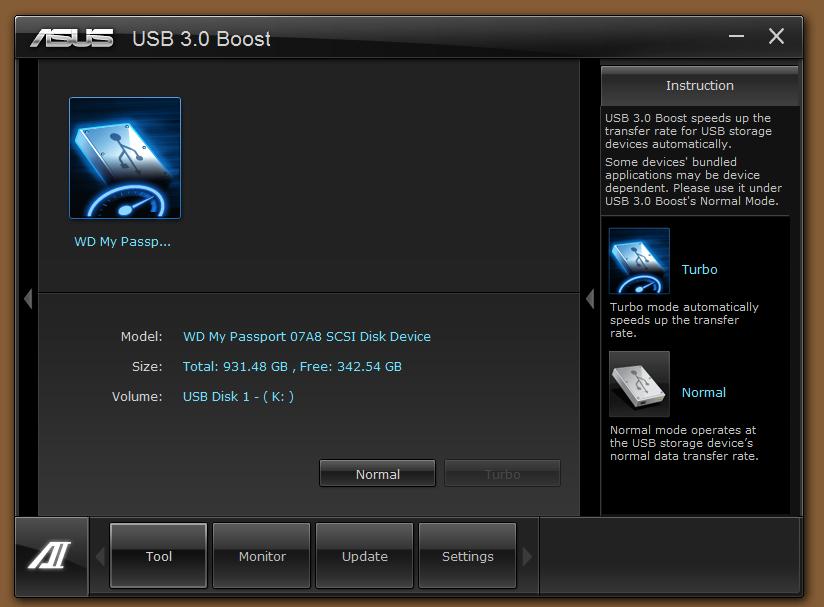
Until I installed the [optional] ASUS "Boost" BOT Storage Driver, an attached USB Hard drive would drop to 10 MB/s after a few seconds of sustained transfer. After the "Boost" driver is installed it regularly "sustains" 88 MB/s transfer rates. This partially depends upon the capabilities of the device attached to the host controller.


ASUS describes their alternative storage driver as supporting the latest UAS Protocol (UASP) which is a workaround for the USB 2.0 BOT (Bulk Only Transfer) protocol originally designed for USB 2.0 "High Speeds". Theoretically 450 Mb/s divide that by 10 and multiply by 0.8 is practically 36 MB/s but most share the USB bus with other devices and the host controller sits on a PCI bus which allocates a reduced amount of bandwidth.. typically 15% so that comes out to about 5.4 MB/s

So obtaining 10 MB/s on a dedicated USB bus with no other devices is actually quite remarkable.

However using the "Boost" Turbo mode for the USB 3.0 BOT driver consistently returns 88 MB/s for me, and is quite worth the effort to figure all this out.

The details are available online at this URL

How ASUS USB 3.0 Boost UASP Mode accelerates transfer speed

Essentially it appears they are "streaming" the data in a deeper queue before confirming a transfer, taking advantage of greater reliability over the USB 3.0 bus, less retransmits become more efficient and this removes some of the overhead. For network engineers this is the equivalent of using "Jumbo Packets".

Additionally they "package" or bundle the transfers in some manner in "Turbo" mode to increase the speeds further. For the compression specialist think on the fly compression on the device and decompression on the host controller.

It all requires USB 3.0 hub hardware that supports the new modes,  an operating system driver that supports the new modes and a USB 3.0 device connected to the host controller root hub, that at least supports the alternative UASP protocol. The different choices being, run in "Normal" USB 2.0 BOT mode, run in "Enhanced" USAP BOT mode, or run in "Turbo" Boost BOT mode. (the knight rider would be impressed..)


What was missing was the new ASUS [host controller] "root hub" software driver for the operating system I was running. [ ASUS USB 3.0 Boost Storage Driver ]


This had to be downloaded from the ASUS website for my motherboard and operating system:


Installed

And rebooted the new "alternative" USB 3.0 BOT storage driver ["Boost"] is detected and installed, as well as the "normal" USB 2.0 BOT storage driver, there is no need to remove and reinstall the host controller drivers. If you do be aware that the host controller drivers that came on the DVD with your motherboard or system are probably a better "fit" than the latest ones available from the ASUS website or Microsoft driver update. The simple fact is once a batch of motherboards leaves the factory most driver development stops and both of these alternative sources of drivers are not rigourously tested with your particular motherboard. Its sad but true. So your best bet is to stick with host controller drivers you know work, at least until the "Boost" driver is working.


The rest is pretty much automatic, the new driver will detect if UASP or Turbo modes are possible and put them into effect when a compatible USB device is attached to the host controller root hub.

This motherboard has an additional system tray tool for interfacing with the BIOS and can also interact with hardware to show more information than is normally available through the operating system.

In this case it interacts with the USB 3.0 host controller driver to indicate the mode in which it is communicating with my Western Digital Passport USB 3.0 external hard drive.


9/11/2014

HP SIM, WBEMTest Indications using WMIC

Its rather unintuitive how to use WMIC to send a Test Indication to HP SIM, here's how to do it.

C:\wmic /namespace:\\root\hpq  Path  HP_WinComputerSystem where Caption="afs00-2.agnet.tamu.edu" CALL  SendTestIndication TestIndicationID=101

First you need to be aware that Methods on a Class can be [Static] or [Non-Static], a static method can be called at the same time as Instantiating (aka 'Creating') a New Instance of a Class. A non-static method can be called only an "Existing" Instance of a Class.

To send indications from a managed server using the HP SIM WMI Providers, they must be installed and running.

The HPWinComputerSystemProv WBEM/WMI Provider, comes with a Class called HP_WinComputerSystem which creates a New Instance on startup and has a [Non-Static] Method called SendTestIndication.

SendTestIndication takes exactly one [In ] Param TestIndicationID of Type CIM_UINT32 which maps through VT_I4 to WMI (uint32) -- basically "its a number, not a string" but even if you surround it in quotes when using wmic.exe, it will still treat it as a number and you will not have a type problem.

Ok, works - TestIndicationID=101
Ok, works - TestIndicationID="101"

As a concrete example you can "walk" the CIM using WMIC to Create a brand new "shiney" copy of any Object based on the HP_WinComputerSystem Class definition, and retrieve (all) of its default Properties and Values, as follows:

C:\wmic /namespace:\\root\hpq  Path  HP_WinComputerSystem  GET /all /format:list

And this brand new Object instance has a Method on it, we can "ask" how to use it, as follows:
C:\wmic /namespace:\\root\hpq  Path  HP_WinComputerSystem  CALL SendTestIndication /?


Beware! - This might lead one to believe its as simple as then providing the param TestIndicationID with a value and the Method would be executed. -- That [ will not ] work!

There is a really [ BIG ] difference between a brand new Instance (copy of a Class definition) which you just Created, and a "Pre-Existing Instance" that has been hanging around since the System started up. The original Instance has been kicked, used, abused and had first access rights to everything in the system. As such it has "Experience" and "History" within the system in which it lives, or exists, and is probably the one you actually want to be using, when you perform a Method Call.

To really drive this point home, some Methods will "refuse" to Execute on brand new Instances, because those brand new Instances are "second rate" copies that probably do not have the Information or Control over the things you want the Methods to operate on.

And you should probably be aware that as soon as wmic.exe is finished with this brand new shiney object, its going to be "thrown away" by the operating system, reaped, garbage collected.. desolved.. and its resources recycled.. hasta la vista.. so your wmic "derived" shiney new object will not be hanging around for very long. In this regard [Static] implies for "this instance in time", very temporary, and "not very useful".. so Executing a Method on a [Static] object is just silly. It's like taking a hammer to a glass sculpture.. its very brittle.

Dynamic objects (or [Non-Static]) objects are much more robust, they hang around and get used alot, they've been around the block a time or two and invoking Methods on these types of Objects is much more useful. Of course they need long term caretakers that "sponsor" them in the operating system ecosystem, so they are not taken out and thrown away by the operating systems recycling system. And that's the job of the WMI Providers that provide WBEMServices, when they startup they create these default Instances of the Classes and keep them going.

To a degree declaring a Method as [Non-Static] saves you time, and helps eliminate confusion, did you remember to refer to the Object you really wanted to execute that Method on? Or did you create a new one and immediately turn around and invoke a Method that is not going to return anything useful?


For example:

This ERROR message can be misleading, because it refers to the CALL verb and not the Method.

This Method is [Non-Static] meaning it cannot be CALL'ed without referring to an 'Existing' Instance.

You 'cannot' call the Method by 'Creating' a new instance at the time of the CALL (that would require a [Static] Method), SendTestIndication is not a [Static] Method. That is what the ERROR is saying, the Class instance provided, that is, the brand new one... just created.. has a Method called SendTestIndication but since it is [Non-Static] it cannot be called on a recently created Instance.

In a way, you made a choice by [not] specifically telling the CALL (which) Instance of the Class you want to invoke this Method on.. by providing no specific way of telling (which) Instance.. wmic "assumed" you wanted to "Create" a whole brand new one in memory, and proceeded to do so for you.. then it <pointed> the CALL at this brand new copy and said { This "one".. use This "Instance" that I just created.. and invoke the Method attached to this "New" copy. }

Its a little confusing, because the Method is attached to the Object just created, but its a matter of "where else" would you logically declare methods that are going to work on this Object type in source code? Group them together.. and we'll make a note the CALL can read later that says [caution! do not allow this Method to be called if the Object is brand new.. aka "static"] If the object hangs around it will be declared "non-static" and CALL will allow that.

The CALL'er is looking at the Parameters proposed to feed the Method and 'saying' { You know what? Nope.. that's wrong, its not right and I'm not going to allow this. Your providing "Invalid method Parameters" and I'm shutting this operation down.. end of story. }

The Class Instance is "new" not "existing" and that is an {'Invalid method Parameter'}

[Instead] a reference must be made to the {one} Instance of HP_WinComputerSystem that was created when the HP WMI Provider service was started on the system. That means a CALL must be made referencing the "already Existing" instance of the HP_WinComputerSystem Class.

In WMIC a reference can be acquired by "prefixing" the "CALL" with a specific "query" such as the following:
C:\wmic /namespace:\\root\hpq  Path  HP_WinComputerSystem where Caption="afs00-2.agnet.tamu.edu" GET /all /format:list
The original "walk" of the CIM properties for this Class "Instance" revealed a property named "Caption" since there is only "one" Instance for this Class possible per machine, the query will return exactly one reference to an "Existing" Instance which will then be used as the starting point for invoking the Method.

If you run the last wmic command and look closely at the Properties of the Object it returns, you will see as "Christmas trees" go.. this Object is much more detailed and decorated with more Values than a shiney brand new copy that hasn't really been around very long. Its probably been hanging around in memory for quite a while and other Classes and services have strolled on by decorating it and updating with useful state information.

It is possible for some Classes to manifest themselves as "more than one" Instance, in which case either the query must narrow the possibilities down to a single instance, or a command line FOR /F loop must be used to wrap the entire call to perform the same Method for each Instance found.

In that case the loop statement effectively "filters" the results and presents only "One" object to the Method invoker at a time, it queues them up and makes everyone stand in line.. so only one Method is invoked by the magic CALL'er wand at a time.

Enabled and disabled, multiple network interfaces on a server come to mind..

When the original "walk" was listed it also provided the current value for the Caption property and it is used as the selector for the instance in the following example. The "name" property is also commonly used.

In reality probably any Instance property could have been used, this one was picked at random.

The results will now return a ReturnValue, but in 'this case' is still not sufficient to achieve a successful Indication event on the HP SIM server.


In this case the Method is invoked, and returns an OUT param called "ReturnValue = 4"

This is actually an Error coming from the Method, and is explained by looking at the Description for the Method
C:\wmic /namespace:\\root\hpq  Path  HP_WinComputerSystem where Caption="afs00-2.agnet.tamu.edu" CALL  SendTestIndication /?:Full

In this case the Method is 'saying' the ReturnValue = 4 means an inappropriate value (not valid) is being submitted by the param 'TestIndicationID=1'

A look at the Description for the MOF of the param 'TestIndicationID' using WBEMTest reveals appropriate values for the TestIndicationID:


Internal identifier of the test event to generate
101 - Informational Test Event
102 - Warning Test Event
103 - Critical Test Event
 And the final result is:
C:\wmic /namespace:\\root\hpq  Path  HP_WinComputerSystem where Caption="afs00-2.agnet.tamu.edu" CALL  SendTestIndication TestIndicationID=101

note: while this will work from a standard console prompt, it will return a syntax error from a powershell prompt. "Unexpected switch at this level." The pre-processing of "quotes" within powershell is especially complex when calling legacy command line tools which also depend upon and pre-process the quotes, which I suspect "provokes" a technically accurate "if inconvenient" syntax error at "one of" the pre-processing times, either by powershell or the command line invoker of the legacy command line tool. I suspect a mixture of pre-processor specific "escape" characters and redundant or re-diracted specific single and double quotes would result in the same result without an actual syntax change to the original statement, simply by accounting for the extra powershell pre-processor oversight.


The TestIndicationID values will correspond to the EventID numbers {1,2,3} available to choose from in the SMH and standalone applications GUI
101 - Informational Test Event
102 - Warning Test Event
103 - Critical Test Event
 

When the Method is called there will be a discernable [ delay ] before returning the [ ReturnValue ] output, the Indications will immediately show up in the HP SIM Management Console as a generic

[ Event Type ] "Test Event"
 
Orange (!)  Major Inverted Triangle for TestIndicationID=103
Yellow (!)  Minor Triangle for TestIndicationID=102
White (I)  Info Circle for TestIndicationID=101


It might belong in a different Blog entry but quickly.

You can do the same thing with WBEMTest.exe

1. open a command prompt

2. type wbemtest.exe


3. press Connect

4. change the Namespace to [ root\hpq ] this is where all HP Providers put their Classes, Instances


5. press Connect


6. from this new Viewpoint, conduct a Search for "Instances" of Class "HP_WinComputerSystem"

7. press the [Enum Instances] button and type in a Search pattern for the Instances of Class

8. there will be a long "pause" while it conducts the search with very little feedback

9. it will return a list of "all" Instances that originated by instantiating a copy of the SuperClass

A. Its important to notice the result box cannot be resized, but all of the line is important when referring to this very specific "Instance", which you will need to "launch, fire, or properly execute" a [Non-Static] Method - so manually copy it down or make a note of it; the cut and paste, clipboard does not work in this tool

B. Close the Query Result and press [ Execute Method..] button

 C. type in the "very specific" Instance line you found before

D. use the drop down to select the [Non-Static] Method of this "specific" Instance of HP_WinComputerSysetem - (method) SendTestIndication

E. press the [Edit In Parameters...] button  (notice: "In" corresponds to the [In] parameters )


F. in the "center" Properties box, scroll down select TestIndicationID and [Edit Property]


G. punch the "Not NULL" Value radio button and type a value of 101 then press [Save Property]


H. then press [Save Object]


I. then press [Execute!]

J. after a very long pause the Result box will appear, and the HP SIM console page will indicate it received an Event from this end point


9/08/2014

HP SIM, sending WBEM test indications


Once a sytem is setup for monitoring within Systems Insight Manager, it will usually have a copy of the Systems Managment Homepage (SMH) service installed.

This is a webpage user interface for accessing data from the HP WBEM providers/agents for intiating various tasks and applications to assist in the mangement and monitoring of the server.

The address for the webpage is usually https://localhost:2381 or https://<name or ip address for host>:2381 (if it is accessible through the hosts firewall).

From the top menu:

Settings >> Test Indication >> Send Test Indication

From here you can select a Type of indication which will use the WBEM subscription between the HP SIM instance and this server to send the equivalent of an SNMP Trap to the HP SIM mangement server.


Including a a lot of useful information in the HP SIM Event which is logged.


Equally there is a GUI tool available from the command line or the Start Menu

C:\Program Files\HPWBEM\Tools\HPWbemTestEvent.exe


The corresponding WMI command line tool is wmic.exe:

And example of how to send a WBEM test indication is:

C:\wmic /namespace:\\root\hpq  Path  HP_WinComputerSystem where Caption="afs00-2.agnet.tamu.edu" CALL  SendTestIndication TestIndicationID=101

The following will log an event to the Windows Operating System Event Log, but it will not generate a WMI Indication to be forwarded as a WBEM Indication. As such it is merely "interesting" and offered for completeness.

C:\> eventcreate /t {information|warning|error} /id {1|2|3} /l system /d "This is an Informational Test Event."

For example:

C:\> eventcreate /t information /id 1 /l system /d "This is an Informational Test Event."


iPXE, USB3.0 development platform


Currently I'm most familar with using VMware Player as a host platform for developing iPXE code. To work with new USB3.0 hardware I've discovered I'll need to upgrade the host OS I am using for VMware.

In the beginning I was using Windows 7 as the VMware host, and CentOS 5 inside a VMware virtual machine to compile and a second VMware virtual machine to boot from the iPXE.iso image.

This worked well because the Windows 7 (x64) host could "pass-thru" access to PCI and USB host controllers to one of the VMware virtual machines.

But VMware will not "pass-thru" USB 3.0 host controllers because Windows 7 does not contain a native Microsoft USB 3.0 host controller driver. Further VMware mentions specifically one of the Renasas (NEC) chipsets as "tested" and known to work. Fortunately the adapter card I obtained is a Renasas (NEC) chipset card and should work.

This leads me to conclude that to establish a new USB 3.0 development platform for iPXE I will need to upgrade to a Windows 8 (or a Windows 2012) host operating system and a version of VMware Player that supports "pass-thru" for the USB 3.0 host controller. I am debating whether to use a separate hard disk, or to perform some sort of dual boot scenario.. though my intuition is to maintain a separate hard drive for each purpose. Multiboot scenarios are often hazardous to not only the disk contents, but also the integrity of the boot loader for each and complex disk management while focused on virtual machines can get confusing.

After arranging all of this, it will be very interesting, just to confirm or deny that the original UHCI, OHCI or EHCI emulation (will or will not) work with a true xHCI controller type.

I'm given to understand that (it "might") work, but also that (it "might") not work. I tend to think the latter is more likely.

To work, the new Renasas (NEC) chipset would have to have provisions for the same chipset registers present in the earlier OHCI or EHCI controller types and respond as if it were the older adapter card type in some sort of "fall down" or "fall back" position to support older device drivers.. which would be awesome.. and they have the design rights to make such a device. However it might be in conflict with the later xHCI design goals. And so far I have only tested the UHCI functionality of the USB support added to gPXE before porting it over to iPXE.

I have recently obtained [true] EHCI > UHCI and EHCI > OHCI (Legacy PCI) adapter cards for the purpose of testing the code as close to specification as possible. that is I want to make sure not only UHCI but also the OHCI driver works. But I have not had the time, "the playing board is set" as they say but I have lacked the microseconds necessary in my schedule.

I have also recently obtained a [true] xHCI (PCI Express, or PCIe) adapter card for the prupose of testing the functionality of the "existing" xHCI > OHCI (or lack of functionality). But it requires setting up a different motherboard with a different operating system to support VMware USB 3.0  - "pass thru" for the PCIe card. And then creating a virtual machine with a newer version of CentOS with a newer kernel that also supports the USB 3.0 chipset and bus.  This is certainly doable, its just a matter of time.

Then there are individual USB Ethernet device drivers. So far I have only verified the Asix device driver using the 100 Mbps chipset, there is a second using the 1000 Mbps chipset which it appears a cloner of the ipx/usb-device-drivers Git project is already testing. The results of that test will no doubt be USB 2.0 specific, but most interesting.

As far as I can tell, if the Intel or Via version of the xHCI controller truly deviates enough from the specification that a "different" PCIe host controller driver is necessary, it may be unsupported for a while. I think however Linux may have implemented different host controller drivers to support advanced features unique to variants of the xHCI device (Power Management, TOE, VLAN tagging, Bonding, ect..) and for the more mundane and common features.. it is possible a common generic xHCI driver will support both pseudo xHCI > UHCI as well as xHCI > OHCI variants of the xHCI device.. which would be truly awesome.

To get the speed up through the USB stack however, a rewrite of the USB stack paralleling the rewrite for the Linux host controller device drivers may be in order.