More info from the edge. This weekend has been quite a bit of real experience with UEFI up close and personal using an HP Stream G2 netbook.
The BIOS defaults to booting Win10 from a GPT-EFI partition and runs Win10 from an NTFS partition. The NTFS partition is divided into two volumes on an eMMC - electronic mult-media memory chip embedded on the main/motherboard.
Unlike Chromebooks which have a stripped down and bare bones BIOS, the Stream book has full features for booting from an MBR or GPT partitioned style storage device, using an eMMC or a USB bus device connected to the main/motherboard.. but it cannot boot from a microSD storage device deven though it has an SD memory slot.
What that means is the BIOS will scan those two buses eMMC and USB for storage devices and then look into devices on them for MBR or GPT partitioned disks.
When it does any MBR or GPT partition device with either an "Actrive" or "EFI" marked parition will be listed in its selectable boot menu "esc-F9" and can be chosen to attempt an operating system boot.
MBR is a four Primary partition, and Logical parition mini-index format description system at the top of the drive for locating an "Active" boot partition within the first 2 TB of an LBA - logical block access drive..
Limited by either the sector size and/or the number of blocks that a 16 bit BIOS can access.
The MBR slots contain the actual position within those blocks where the first boot sector for an Active partition can be found. It automatically loads the first few blocks into memory and gives control over to them by setting the CPU program segment pointer to the first one and performs an execute.. generally its a tiny machine language program that "bootstraps" by loading the next few sectors which is a filesystem driver for accessing "that" partitions "specific" filesystem and scans for the second stage bootloader for the pre-loader for that operating system.. the "preloader" generally does things specific to the operating system like preloading device drivers the kernel will need in memory in order to access the rest of the storage device.
Then the preloader loads the kernel into memory and jumps to its startup routine. The operating system decompresses the kernel, performs inventory and additional hardware specific platform "parts or bus initialization", and any plug and play autodetect and addtional device driver loading and initialization and then begins to provide feedback to the end user via the default local console.. a serial port or vga monitor.. then turns over control to a windows "manager" and presents a logon screen.. those are the general steps of most "windows like" systems.. be they microsoft, apple or linux.
GPT has a multiply redundant, "fake" MBR partitioning system for use for storage devives larger than 2TB.
A fake MBR is created at the top of the drive for marking the drive with a serial number and to indicate to old style BIOS boot systems that the drive is in use and contains information it can't see.. or that it is at least not "blank" and indicates caution should be exercised if the BIOS cannot further scan the storage device.
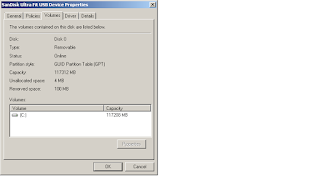
GPT has multiple copies of its mini-Index system for listing partitions on the drive, at the Top, Middle and Bottom of the drive. If one becomes damaged the others can be used to detect the damage and also wage an election to determine a quorum or tribunal of which contains the accurate information without having to perform extensive bitwise parity reconstruction of the data. Like MBR the paritions can be marked with a partition "type" for MBR that is simply "active or not active", but for GPT its more extensive, more generally one parition will be marked as an EFI - ESP - Extensible Firmware Partition, with a "hexidecimal type code" which is also a FAT32 filesytem format partition intended to contain mini-32 bit programs the UEFI can load into memory and execute, be they "C" programs for performing diagnostics, maintenance or bootstraping an operating system.
Since they are 32 bit prorgams they can have longer and larger sector registers in memory to seek deeper into an LBA drive and aren't limited by the MBR-LBA limit of 2 TB on storage devices with 512, 2048 or 4096 byte sectors. Some later 16 BIOS could work with larger byte sector discs but not all.
More complex 32 bit programs than were possible with 16 bit programs in a bootsector are possible. While MBR could load overlay programs to do something similar, few hard drive manufacturers released the hardware specific details to make this possible and moving the ability into programs loaded by UEFI made it easier to be more broadly accepted.
.. to be continued
8/19/2018
Win2Go Win7 on an HP Stream G2, booting from UEFI, GPT, NTFS
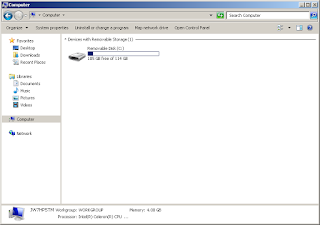
Didn't take as long as I thought. The HP stream book BIOS will recognize and can be set to autoboot from a USB flash drive with a GPT, EFI partition and a native NTFS file system on an uncertified "Removable" type disc. Boot time 25 sec, shutdown time 12 sec..
Your not supposed to be able to this, for several reasons.
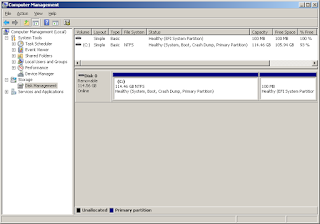
First Windows 7 up through Windows 10-1703 would "recognize" a USB Flash drive as type "Removable" and (A) Prevent creating Multiple Partitions - so no seperate EFI partition was possible (B) if Multiple partitions were somehow created on another operating system and present, it would enumerate with a drive letter only the "First" Primary partition it found with a supported file system, or the "First" logical partition if no others were found - Since Windows always created three to four partitions in the order - EFI, WinRE, Boot/System, Recovery - the Boot/System would never be enumerated and thus setup files could not be copied to the partition.
Certain [very expensive] "Certified for Windows To Go Win8, Win10" USB flash drives for the elite editions - could have their Removable RMB "bit" set in software to "announce" themselves as disc type "Fixed" - which would allow on Win8 or Win10 to create special Windows-To-Go bootable discs.
And if you actually did have a special certified disc and but not a special edition of Win8 or Win10 - it would refuse to continue during Windows setup at the point when you had answered all of the prior interview questions and committed to install - The message would say USB and IEEE1394 connected devices were not supported for install.. this includes SSD or external hard drives connected by a USB or Firewire connection.
This is a lot of barriers stacked against even the possibility of making this happen.
Most bootable USB Windows To Go, builder tools generally can't work around all these barriers.. some "will" partition the whole drive as type disc MBR and format one partition as FAT32 and copy a SysPrep style unattended setup.. to install Windows 7 regardless of the barrier to not install Windows 7 on a USB or Firewire disc.. it gets around this by "by-passing" the "guided interview" step that allows the Setup program to detect its an unsupported device and halts the setup.
Then you would have to have a BIOS that supports USB 2.0 booting from an MBR disc and has Legacy CSM and can boot Unsecure (unsigned) kernels like Windows 7 - which this type of computer all but disappeared after 2012 when USB 3.0 ports became the norm on nearly all platforms seeking to support Windows 8.0 - Windows 7 does not come with in box device drivers, and certainly not Boot time enabled "signed" device drivers for USB 3.0 ports - without a boot time device driver to power up and enable the port and enumerate and preset any attached USB device, the storage for the Boot/System volume is simply not available to the Windows kernel and start up would halt.
You can auto install a selection of USB 3.0 and NVMe, ACHI device drivers into all of the boot.wim and install.wim "clg" or class group (editions or versions) on a multi-install media ISO and build an MBR bootable SysPrep installer.. but different USB 3.0 hardware controllers exist - for those you can use the dism.exe tool to manually /forceunsigned install more drivers which will prevent a STOP 0xc0..07B error.
You [can] rearrange and partition two partitions on an uncertified USB flash drive, so a native EFI-FAT32 partition exists.. which a BIOS looking for a GPT partitioned disc [can] find and offer to auto boot - by placing the NTFS partition [before] the EFI rather than [after] which is the "norm" with the Windows Setup partition creation step (and rather un-intuitive) the BIOS UEFI-GPT-FAT32 routine can find the EFI partition by its format type (FAT32) even on a large GPT disc quickly and find the UEFI bootloader and BCD store that directs it to the NTFS partition and loads the USB 3.0 device drivers boot before kernel start-type.. which loads the USB 3.0 device drivers into memory before the windows kernel.. making the USB 3.0 ports live and the devices attached to them accessible for fetching the remainder of the Windows System.. bootstrapping the SysPrep installer and completing the normal boot Windows installation.
You can take advantage of those [pre-existing] NTFS then EFI partitions to make a Boot and System partition with bootable SysPrep image for Windows 7 and enable complete setup and install.
That seems a lot of balls to juggle.
But this has Usefulness beyond this "one application" it means that USB 3.0 devices other than flash drives attached to USB 3.0 ports can be used as installation targets.. including USB Fixed HDD drives - which are normally excluded from the Setup program as a target, and Firewire attached drives. External SSD and IEEE 1394 devices are generally faster more reliable and easier to find than a high capacity USB flash drive which might wear out sooner than later. - But with 3 and 5 year Flash Drive warranties.. its mostly a personal file backup hygiene issue.. Backup4Sure is a really good folder to zip container automated backup tool which is really great for this purpose.
In old Apple terms this is a [Target Mode] boot capability for all Windows (versions) allowing many recovery and backup scenarios, or forensic and diagnostic modes. On current and UEFI only hardware. CSM and GOP boot gates are still a minor nusiance.. but can be circumvented to permit pure UEFI environments to also work the same way.
Ultimately this all boils down to a simple setup procedure.
The maintenance and adding of device drivers now depends on one command line command for adding new device drivers to the offline image while the USB drive is plugged into a Win7 or higher computer and its mounted as a plain file storage device.
No .wim files, No .vhd or .vhdx images or ISO images are used on the USB flash drive, they are all plain and simple NTFS file system files.. and thus are not limited by any 4 GB file system limits as might be imposed by using a FAT32 file system for the flash drive. Any file can be updated on another system or copied and replaced at any time.
Its a very flexible and low maintenance.. and very 'familiar' tech support style approaching that which was available with DOS FAT discs many years ago. - Even SSD portable drives were excluded from being used as "bootable" Windows To Go devices with Windows 7.
I used a [ SanDisk Ultra Fit USB 3.0 - 128 GB - 150 MB/s - Flash Drive ] for this which is roomy and fast, but it should work with many other styles and types of USB 3.0 media. The onboard eMMC flash on the HP Stream G2 was undetected and inaccessible.. but is inexpensive and hard to replace or upgrade storage.. it also holds a copy of Windows 10.. it can be used as a backup method of booting the netbook.. and backing up or copying files to the USB 3.0 flash drive when the Windows 10 operating system is taking the lead as the "Online" operating system. It can fully see and enumerate the NTFS partition on the flash drive and natively mount and read write the NTFS files on it. For some reason however.. the Windows 10 native boot is vastly slower than booting from the USB 3.0 flash drive.. and much much slower at shutdown.. performance wise I do not know if this is a failing in the Windows 10 operating system itself.. or whether it is due to the poorer performance of the onboard eMMC storage that is built into the netbook.
In any event it is quit a flexible and high performance upgrade to downgrade from Windows 10 to Windows 7 and boot from the USB 3.0 flash drive.
Your not supposed to be able to this, for several reasons.


First Windows 7 up through Windows 10-1703 would "recognize" a USB Flash drive as type "Removable" and (A) Prevent creating Multiple Partitions - so no seperate EFI partition was possible (B) if Multiple partitions were somehow created on another operating system and present, it would enumerate with a drive letter only the "First" Primary partition it found with a supported file system, or the "First" logical partition if no others were found - Since Windows always created three to four partitions in the order - EFI, WinRE, Boot/System, Recovery - the Boot/System would never be enumerated and thus setup files could not be copied to the partition.
Certain [very expensive] "Certified for Windows To Go Win8, Win10" USB flash drives for the elite editions - could have their Removable RMB "bit" set in software to "announce" themselves as disc type "Fixed" - which would allow on Win8 or Win10 to create special Windows-To-Go bootable discs.
And if you actually did have a special certified disc and but not a special edition of Win8 or Win10 - it would refuse to continue during Windows setup at the point when you had answered all of the prior interview questions and committed to install - The message would say USB and IEEE1394 connected devices were not supported for install.. this includes SSD or external hard drives connected by a USB or Firewire connection.
This is a lot of barriers stacked against even the possibility of making this happen.
Most bootable USB Windows To Go, builder tools generally can't work around all these barriers.. some "will" partition the whole drive as type disc MBR and format one partition as FAT32 and copy a SysPrep style unattended setup.. to install Windows 7 regardless of the barrier to not install Windows 7 on a USB or Firewire disc.. it gets around this by "by-passing" the "guided interview" step that allows the Setup program to detect its an unsupported device and halts the setup.
Then you would have to have a BIOS that supports USB 2.0 booting from an MBR disc and has Legacy CSM and can boot Unsecure (unsigned) kernels like Windows 7 - which this type of computer all but disappeared after 2012 when USB 3.0 ports became the norm on nearly all platforms seeking to support Windows 8.0 - Windows 7 does not come with in box device drivers, and certainly not Boot time enabled "signed" device drivers for USB 3.0 ports - without a boot time device driver to power up and enable the port and enumerate and preset any attached USB device, the storage for the Boot/System volume is simply not available to the Windows kernel and start up would halt.
You can auto install a selection of USB 3.0 and NVMe, ACHI device drivers into all of the boot.wim and install.wim "clg" or class group (editions or versions) on a multi-install media ISO and build an MBR bootable SysPrep installer.. but different USB 3.0 hardware controllers exist - for those you can use the dism.exe tool to manually /forceunsigned install more drivers which will prevent a STOP 0xc0..07B error.
You [can] rearrange and partition two partitions on an uncertified USB flash drive, so a native EFI-FAT32 partition exists.. which a BIOS looking for a GPT partitioned disc [can] find and offer to auto boot - by placing the NTFS partition [before] the EFI rather than [after] which is the "norm" with the Windows Setup partition creation step (and rather un-intuitive) the BIOS UEFI-GPT-FAT32 routine can find the EFI partition by its format type (FAT32) even on a large GPT disc quickly and find the UEFI bootloader and BCD store that directs it to the NTFS partition and loads the USB 3.0 device drivers boot before kernel start-type.. which loads the USB 3.0 device drivers into memory before the windows kernel.. making the USB 3.0 ports live and the devices attached to them accessible for fetching the remainder of the Windows System.. bootstrapping the SysPrep installer and completing the normal boot Windows installation.
You can take advantage of those [pre-existing] NTFS then EFI partitions to make a Boot and System partition with bootable SysPrep image for Windows 7 and enable complete setup and install.
That seems a lot of balls to juggle.
But this has Usefulness beyond this "one application" it means that USB 3.0 devices other than flash drives attached to USB 3.0 ports can be used as installation targets.. including USB Fixed HDD drives - which are normally excluded from the Setup program as a target, and Firewire attached drives. External SSD and IEEE 1394 devices are generally faster more reliable and easier to find than a high capacity USB flash drive which might wear out sooner than later. - But with 3 and 5 year Flash Drive warranties.. its mostly a personal file backup hygiene issue.. Backup4Sure is a really good folder to zip container automated backup tool which is really great for this purpose.
In old Apple terms this is a [Target Mode] boot capability for all Windows (versions) allowing many recovery and backup scenarios, or forensic and diagnostic modes. On current and UEFI only hardware. CSM and GOP boot gates are still a minor nusiance.. but can be circumvented to permit pure UEFI environments to also work the same way.
Ultimately this all boils down to a simple setup procedure.
The maintenance and adding of device drivers now depends on one command line command for adding new device drivers to the offline image while the USB drive is plugged into a Win7 or higher computer and its mounted as a plain file storage device.
No .wim files, No .vhd or .vhdx images or ISO images are used on the USB flash drive, they are all plain and simple NTFS file system files.. and thus are not limited by any 4 GB file system limits as might be imposed by using a FAT32 file system for the flash drive. Any file can be updated on another system or copied and replaced at any time.
Its a very flexible and low maintenance.. and very 'familiar' tech support style approaching that which was available with DOS FAT discs many years ago. - Even SSD portable drives were excluded from being used as "bootable" Windows To Go devices with Windows 7.
I used a [ SanDisk Ultra Fit USB 3.0 - 128 GB - 150 MB/s - Flash Drive ] for this which is roomy and fast, but it should work with many other styles and types of USB 3.0 media. The onboard eMMC flash on the HP Stream G2 was undetected and inaccessible.. but is inexpensive and hard to replace or upgrade storage.. it also holds a copy of Windows 10.. it can be used as a backup method of booting the netbook.. and backing up or copying files to the USB 3.0 flash drive when the Windows 10 operating system is taking the lead as the "Online" operating system. It can fully see and enumerate the NTFS partition on the flash drive and natively mount and read write the NTFS files on it. For some reason however.. the Windows 10 native boot is vastly slower than booting from the USB 3.0 flash drive.. and much much slower at shutdown.. performance wise I do not know if this is a failing in the Windows 10 operating system itself.. or whether it is due to the poorer performance of the onboard eMMC storage that is built into the netbook.
In any event it is quit a flexible and high performance upgrade to downgrade from Windows 10 to Windows 7 and boot from the USB 3.0 flash drive.
8/14/2018
How to Boot, Win7 on Braswell N3050 - HP Stream 11 G2
Before this fades from memory, here is how to install and boot Windows 7 x64 bit on an HP Steam 11 G2 netbook in a fairly uncompromising manner.
First a little background.
I like the Intel Atom series of netbooks, they are fast targeted and really light on battery power, they tend to last all day and were made with some really up to date tech until Windows 10. The latter generations included Windows 8 or Windows 10 "exclusive" models with eMMC memory for boot media.
The problem is eMMC is it is low tech and non-standard as in its usually bonded directly in a random fashion on a netbook or phone such that where and how to access it is unpredictable and depends mostly on a vendor manufacturer to provide a custom device driver for the item.
Windows 8 did come with eMMC drivers, and netbooks did come with a Bios or UEFI boot manager which could pick up the threads and load the OS into memory.. but it was "very slow" and prone to wear and nothing like NAND or Flash memory, or an SSD. Typically eMMC is used for storing photographs and has no controller and its just awful in general. It is better off ignored. And when eMMC burns out it can't be replaced.
Later versions of the netbooks included a "standard" USB 3.0 port or all USB 3.0 ports.. which is a lot faster than USB 2.0 Then "Windows To Go" was introduced for Windows 8.. but not Windows 7. And Windows 7 does not have bootable USB 3.0 device drivers.
The "trick" however is to create a "Windows To Go" like USB 3.0 install of Windows 7 on a USB 3.0 or USB 2.0 class flash drive and boot from that.
"Windows To Go" is not like a bootable LiveCD or ISO and doesn't entirely run from a ramdisk in memory, so effectively it is a full resource operating system running from a fast.. not quite SSD flash drive. And since USB 3.1 flash drives are available, even with their own SSD controllers external to the netbook, they can be even faster than the eMMC built into the laptop. The external accessiblity of the flash drive also makes it replaceable / repairable should something happen to the boot media.. and at 128 GB or 256 GB or beyond the hdd of the netbook becomes near infinite.
Samsung, SanDisk, Kingston and Crucial offer some nice "Low Profile" USB flash drives in 128 or 256 GB capacities which barely rise out of the Left side of the laptop and provide a suitable boot target.
In my case I used a microSD card in a chip sleeve to mount it in the USB 3.0 port. The HP Stream 11 does have a microSD slot, but the Bios is unable to boot from it directly.. also though the UEFI boot manager "might" if used in non Legacy mode. That however is research for anonther day. Besides, leaving the SD slot exposed means even more media diversity. There are two USB 3.0 ports, one microSD port and one HDMI port.. sacrificing one USB 3.0 port for a "standard" boot drive keeps many options open.
AOMEI Partition Assistant Standard Demo / Freeware includes a "Windows To Go" creator feature for Windows 7, 8 and 10 independent of the tools available in Windows 8 or Windows 10. It requires a bootable USB target which must already have been formatted with exFAT or ntfs in order to be detected. It can't see the USB drive if its not formatted.. it will wipe and reformat the drive while prepping for the W2G install, but the prerequisite is a quickformat must already have been performed just so the target can be detected.
Once it is detected and selected an ISO or WIM image must be selected as the "source" of the install files. Its important to note that while ISO is "convenient" many ISO images contain more than one Install.wim file source and AOMEI will only use the first one found. Thus for a generic Windows 7 ISO it will install "Windows 7 Home Basic" which may not be the version / edition that was actually desired. Extracting the specific (Install.wim) file for the version of Windows desired using 7Zip or Dism will allow choosing the specific windows version / edition to create W2G media.
Next executing the create function will mount and (very) slowly create the W2G installation, note it is not creating a "boot image" but instead actually going through all the steps of formatting the media and mounting the install .wim file and extracting the files to build a 'Panther SysPrep' preboot installer / WinPE image on the W2G usb boot media.. it can take an hour or longer. The Progress bar will creep along and reach 00:00 minutes left and then Pause for a good while as it completes the SysPrep image and dismounts the install .wim image all of which take a good deal of time (after) all the files have been copied and the Progress meter reaches 00:00 -- it will produce a seperate Pop-Up window that says "Finished" when done and then "Revert" to ( go again.. do not do this.. you are done..)
Once this is done the boot media is complete, but (will not work) on HP Stream 11 G2 Braswell, (until) additional drivers are installed into the "Offline" windows install on the USB flash drive.
The reason is the Braswell generation has (only USB 3.0 ports) there are no USB 2.0 ports and Windows 7 cannot load an [On Demand USB 3.0 driver] during install or after install in order to retrieve its other Windows operating system files.
Braswell however was made by Intel and they made a NUC Kit NUC5PPYH which used the chipset, and included a USB 3.0 device driver.. as well as Intel Graphics Driver, both will be needed.. but the USB 3.0 is the most important for completing a successful boot.
USB_3.0_Win7_64_4.0.0.36.zip
GFX_Win7_8.1_10_64_15.40.34.4624.zip
Before installing the drivers to the USB flash drive in an "Offline" fashion.
They must be extracted and just the drivers isolated and placed in a directory which can be recursively scanned and then applied to the Offline SysPrep install on the flash drive.
Do this by openning the, with 7Zip and copying:
USB 3.0 driver
\HCSwitch
\Win7
folders to
C:\wim\usb3
then
Plug the USB microSD card into a slot and make sure it shows up as E:\
then
"Remove" the x86 version directories from \HCSwitch and \Win7 (recursion will scan folders and try to install all drivers)
then
"Edit"
C:\wim\usb3\Win7\x64\iusb3hub.inf
C:\wim\usb3\Win7\x64\iusb3xhc.inf
"Seek out" and change (from 3 or OnDemand) the StartType to (0) to make them "boot drivers" that must be loaded by the windows bootloader into active memory before turning over control to the kernel
C:\wim\usb3\Win7\x64\iusb3hub.inf
-------------------------------------
[IUsb3HubServiceInstall]
DisplayName = %iusb3hub.SvcDesc%
ServiceType = 1
StartType = 0
C:\wim\usb3\Win7\x64\iusb3xhc.inf
-------------------------------------
[IUsb3XhcModelServiceInstall]
DisplayName = %iusb3xhc.SvcDesc%
ServiceType = 1
StartType = 0
Then add the drivers to the "Offline" SysPrep Installation (since the folders on the USB drive are not in a WIM file you do not have to mount the WIM file first, simply target the E:\ drive).
The switching from an "On Demand" driver to a "Boot" driver startup type will throw an Error if you don't "forceunsigned" add them, because Normal boot drivers are "boot signed"
If you "/forceunsigned" install the drivers, then they will go ahead an install.
If you "/Recurse" install, the Dism command will search all the folders and subfolders for ".inf" installation instruction files (in-struction f-iles = in-f = .inf "files")
C:\>dism /Image:E:\ /Add-Driver /Driver:C:\wim\usb3 /forceunsigned /Recurse
Installing the Graphics driver is slightly different.
Begin by extracting only the
\Graphics
folder to
C:\wim\Graphics
The Windows system about to install the drivers will detect this as a "foreign" driver and automatically [Block] it from install, attempting to Dism install will result in failure.
The failure will be indicated in the E:\Windows\inf\setupapi.offline.log file
!!! flq: CopyFile: FAILED!
!!! flq: Error 5: Access is denied.
!!! flq: Error installing file (0x00000005)
!!! flq: Error 5: Access is denied.
! flq: SourceFile - 'C:\wim\Graphics\iglhxa64.vp'
flq: TempFile - 'E:\Windows\System32\DriverStore\FileRepository\igdlh64.inf_amd64_neutral_bfb4178e08406e39\SET893B.tmp'
! flq: TargetFile - 'E:\Windows\System32\DriverStore\FileRepository\igdlh64.inf_amd64_neutral_bfb4178e08406e39\iglhxa64.vp'
<<< [Exit status: FAILURE(0x00000005)]
In order to fix this, all the driver files must be [unblocked] which you can do one at a time, right-click Unblock.. but instead you can also use a [Sysinterals] "Streams64.exe" tool do so for the entire directory at one time.
Download
Streams v1.6
Extract Streams64.exe and place it someplace in the path like C:\Windows
This provides a guide:
How to bulk unblock files in Windows 7 or Server 2008
And finally apply the driver
C:\>dism /Image:E:\ /Add-Driver /Driver:C:\wim\Graphics /forceunsigned /Recurse
Deployment Image Servicing and Management tool
Version: 6.1.7600.16385
Image Version: 6.1.7600.16385
Searching for driver packages to install...
Found 1 driver package(s) to install.
Installing 1 of 1 - C:\wim\Graphics\igdlh64.inf: The driver package was successfully installed.
The operation completed successfully.
C:\>
First Install
Booting from the USB flash drive may require "catching" the Bios [Press 'ESC' and then Press F9] in order to select to boot from the USB drive rather than the eMMC -- I'm still working on a smoother way to do this.. but for now.. catch and redirect to the USB drive.
W2G on First introduction to a new system "Profiles" the hardware, and essentially performs a complete SysPrep to detect and configure the Operating System.
If the USB 3.0 drivers are Boot drivers the boot loader will load them into memory before turning control over to the boot kernel and the file system on the USB drive will remain available to the kernel and the install will proceed as a normal setup (for the First Time) on subsequent boots this will be skipped and it will just boot from the USB flash drive quickly as if it were a native HDD.
A single reboot will be necessary during which the Graphics driver and the User profiles will be setup and you will be logged into the desktop. Depending on the original [ Install.wim] file used to create the W2G USB drive 'Activation' may require differnt keys and procedures in order to activate the operating system.
WiFi Networking and Audio
the Graphics driver also included directories with Audio drivers to drive the speakers, you could have copied those and installed them at the same time as the Graphics driver or install them post setup
the WiFi networking for the HP Stream 11 G2 requires
AC-7265 driver set
additional device drivers for the NUC can be found here
NUC5CPYH
Subscribe to:
Posts (Atom)